In this blog post, we dive into the fusion of art, technology, and code, exploring the endless possibilities and efficiency of using Clojure for 3D design. Through 3D printing with code, we can bring complex geometries into the real world with intricate precision.
So let’s dive in to the world of 3D modeling together, and create our first 3D object with Clojure.
Setting Up Your Environment, with Clojure and OpenSCAD
We’ll start by installing the software we need:
- Install OpenSCAD (to visualize and render models in real-time). Visit the official OpenSCAD website and download the appropriate version for your operating system. Follow the installation instructions provided by the software.
- Set up a Clojure environment
- Clone the GitHub project squiggle. When the project is cloned, execute the command
clj -X:newto download dependencies and generate the squiggle.scad file. - Open the squiggle.scad file in OpenSCAD by running
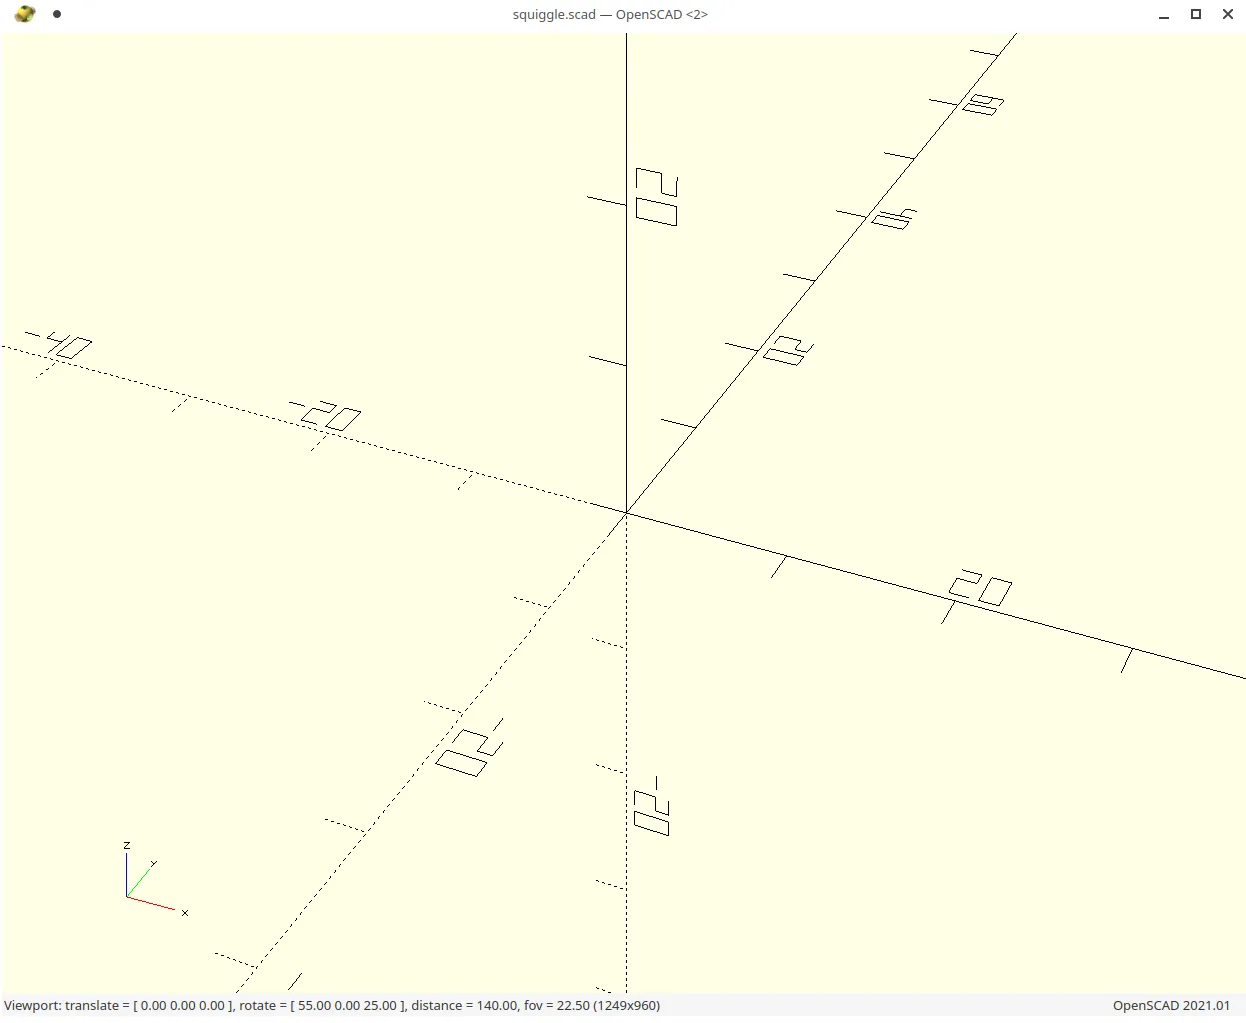
openscad CAD/squiggle.scadfrom the command line in the project directory. - At this point you should see an OpenSCAD screen with coordinates.
- To run the project in Emacs, you can run it by invoking
M-xandcider-jack-in. If you’re using a different IDE, I recommend looking at the official Clojure getting started guide for detailed instructions tailored to your specific environment. - Open the playground.clj namespace. This namespace already contains everything we need to start with our design.
From Idea to Reality: Designing 3D Printable Objects
We’ll start by designing an object using basic shapes. Don’t worry, this approach can lead to creations that are both funny and interesting. We can combine spheres, cuboids, cylinders, and other elementary shapes, to craft imaginative characters, playful sculptures, or quirky inventions. The simplicity of the design elements adds its own charm.
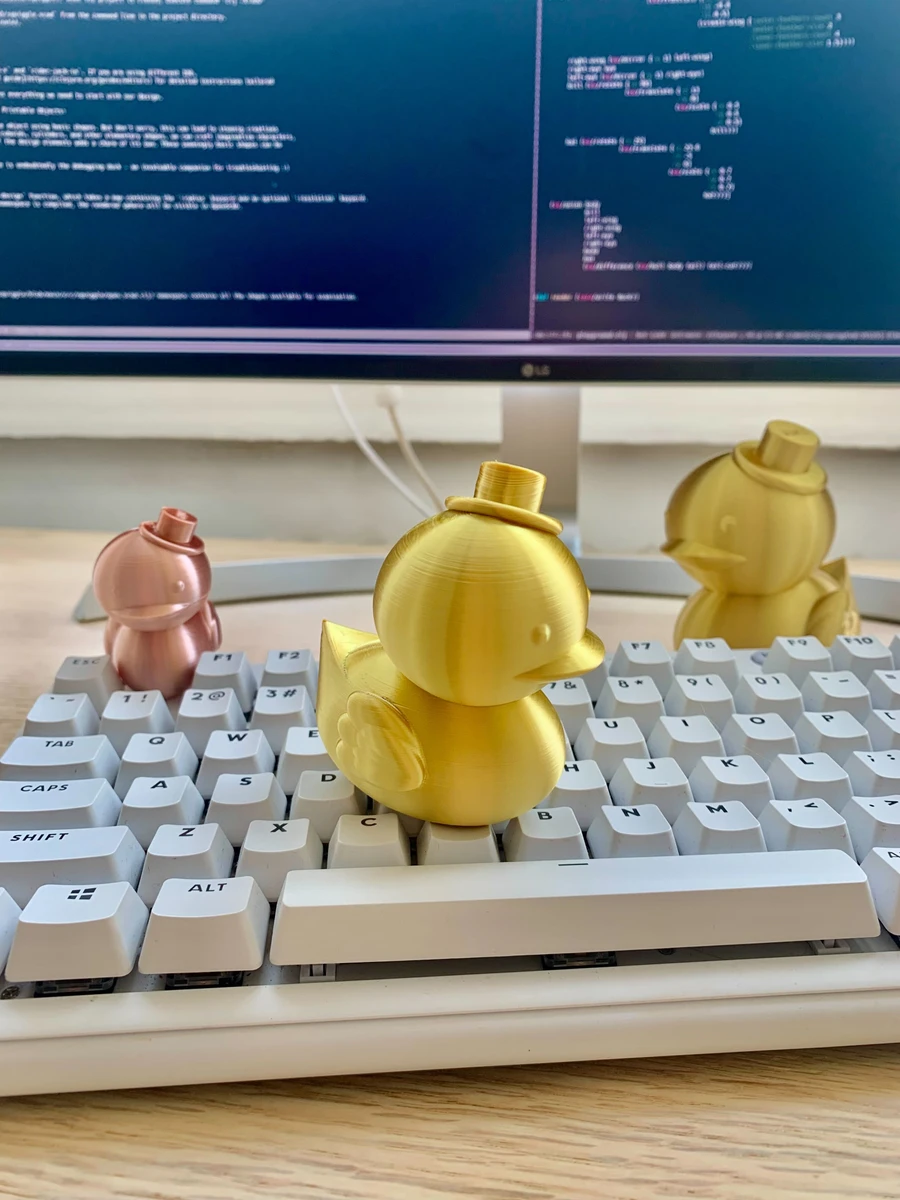
And when you’re a programmer, the ideal first design choice is undoubtedly the debugging duck – an invaluable companion for troubleshooting :)
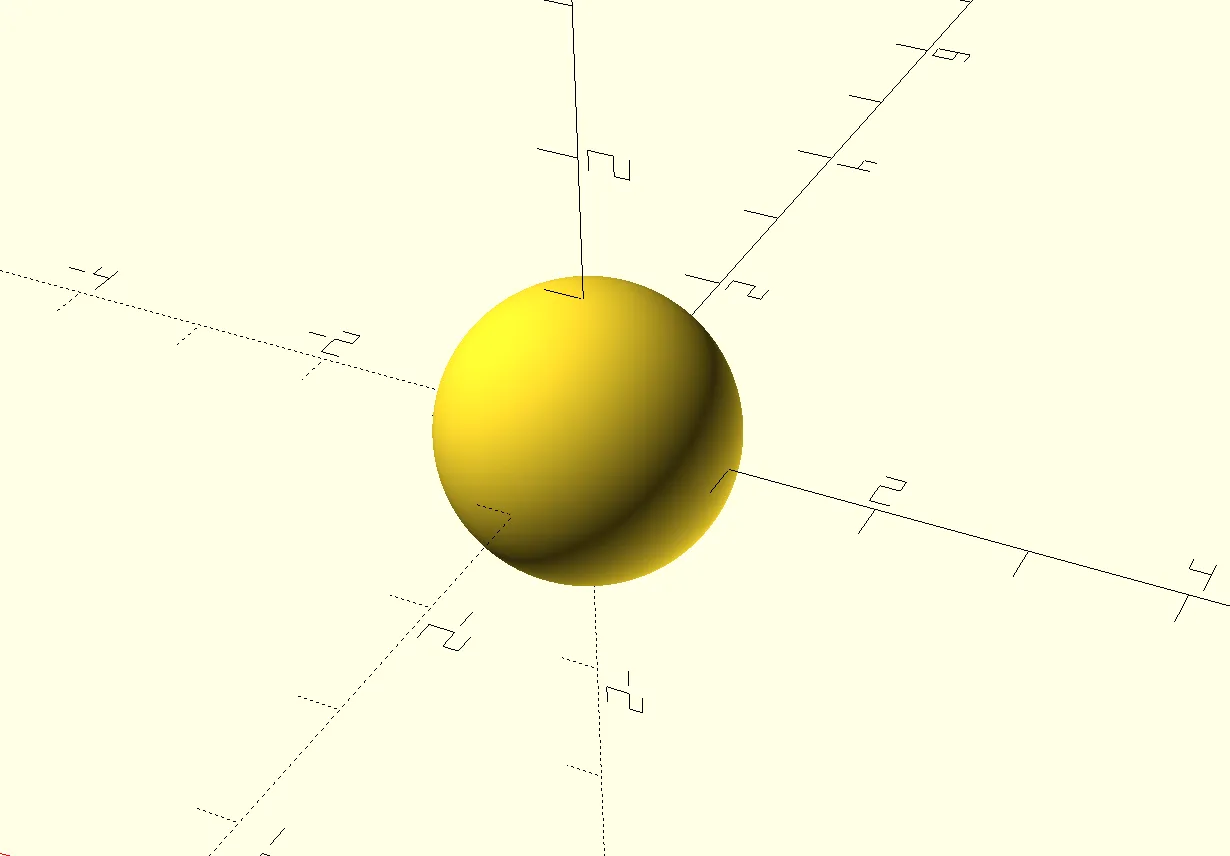
Within the playground.clj namespace, you can find the my-design function, which takes a radius as an argument.
It generates a sphere with the provided radius. Once the namespace is compiled, the rendered sphere will be visible in OpenSCAD.
(def resolution 300)

(defn my-design [radius]
  (os/sphere {:radius radius
              :resolution resolution}))

(core/write (my-design 1))
The open-scad.clj namespace contains all the basic open-scad shapes and functions.
To create the body of the duck, we will use this sphere. As an initial step, let’s rename the function my-design to body so that we can design each part of the duck independently.
(def resolution 300)

(defn body [radius]
  (os/sphere {:radius radius
              :resolution resolution}))
Let’s now experiment with this shape to create a more duck-like form. We can achieve this by scaling it
along the x-axis with a factor of 1.5 and setting the radius to 10. Additionally, we need to render the body definition instead of my-design function call result.
ℹ️ os/scale is used to resize or scale a shape in three-dimensional space
(def body
  (os/scale {:x 1.5}
            (os/sphere {:radius 10
                        :resolution resolution})))

(core/write body)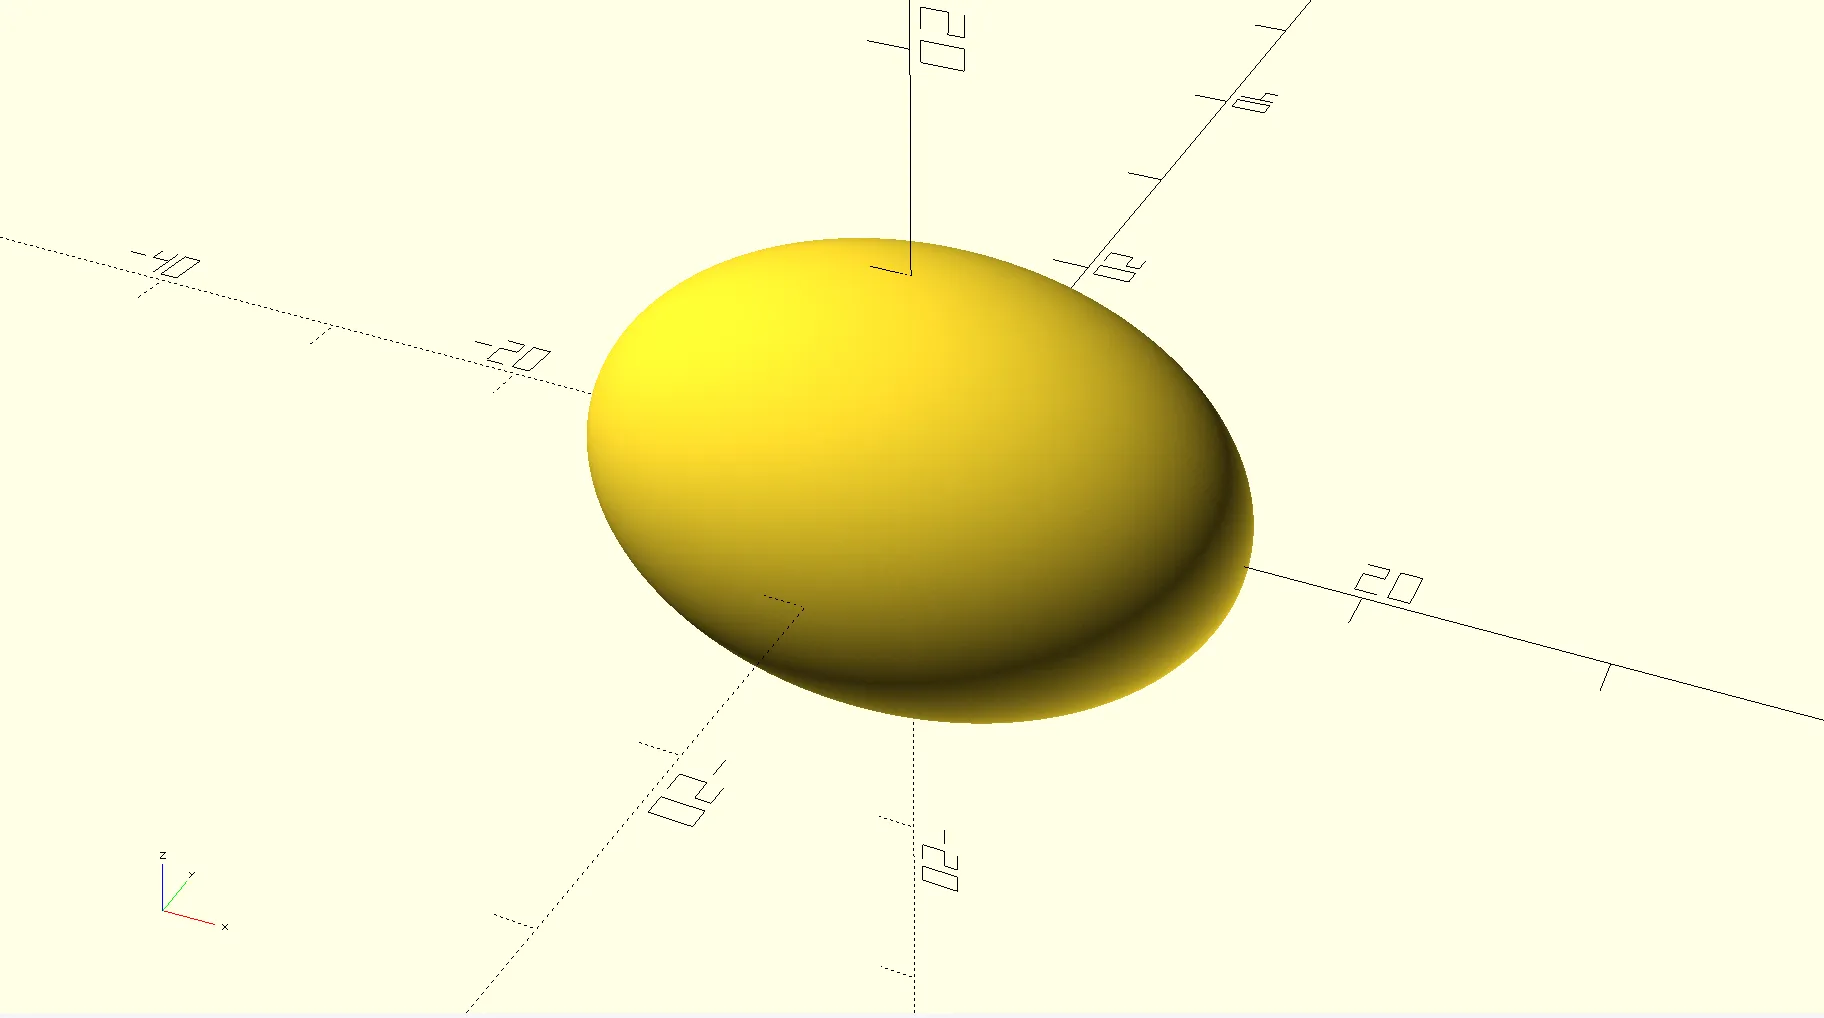
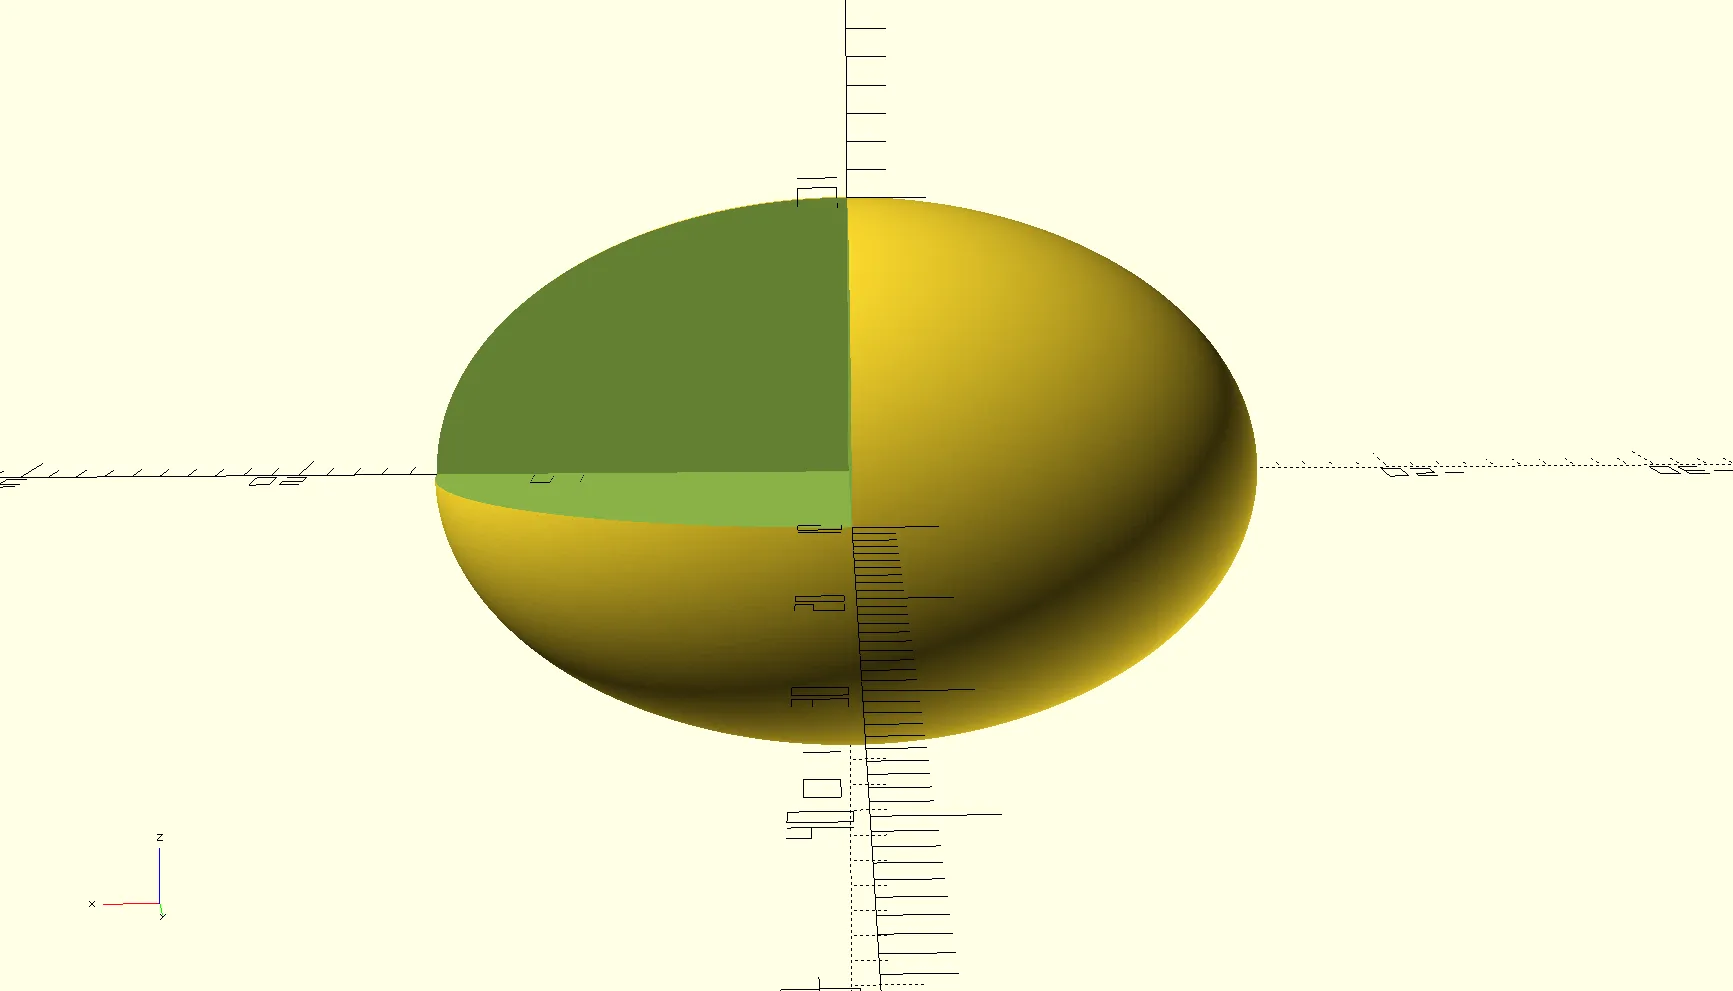
To ensure that our duck can sit on a flat surface, we need to remove the bottom part of the spheroid.
For this purpose, we’ll use the os/difference function. However, before performing the subtraction,
let’s create the shape that will be “cut” from the duck body. It will be a cuboid with dimensions 100, 100, and 10. When creating a cuboid,
we provide a vector of dimensions “a”, “b”, and “c” as an argument.
ℹ️ os/difference is used to subtract one or more shapes from another shape
(core/write (os/cube [100 100 10]))
Although the shape itself is precisely what we need, it requires correct positioning to achieve the desired result. Without proper placement, the shape will not align correctly.
(def body
  (os/difference (os/scale {:x 1.5}
                           (os/sphere {:radius 10
                                       :resolution resolution}))
                 (os/cube [100 100 10])))

(core/write body)
To position it correctly, we’ll use the os/translate function. It accepts a map of positioning coordinates as the first argument and the object we wish to move as the second argument. This way, we can precisely move the object to the desired location.
ℹ️ os/translate is used to move or translate a shape in three-dimensional space.
(def body
  (os/difference (os/scale {:x 1.5}
                           (os/sphere {:radius 10
                                       :resolution resolution}))
                 (os/translate {:z -17 :x -50 :y -50}
                               (os/cube [100 100 10]))))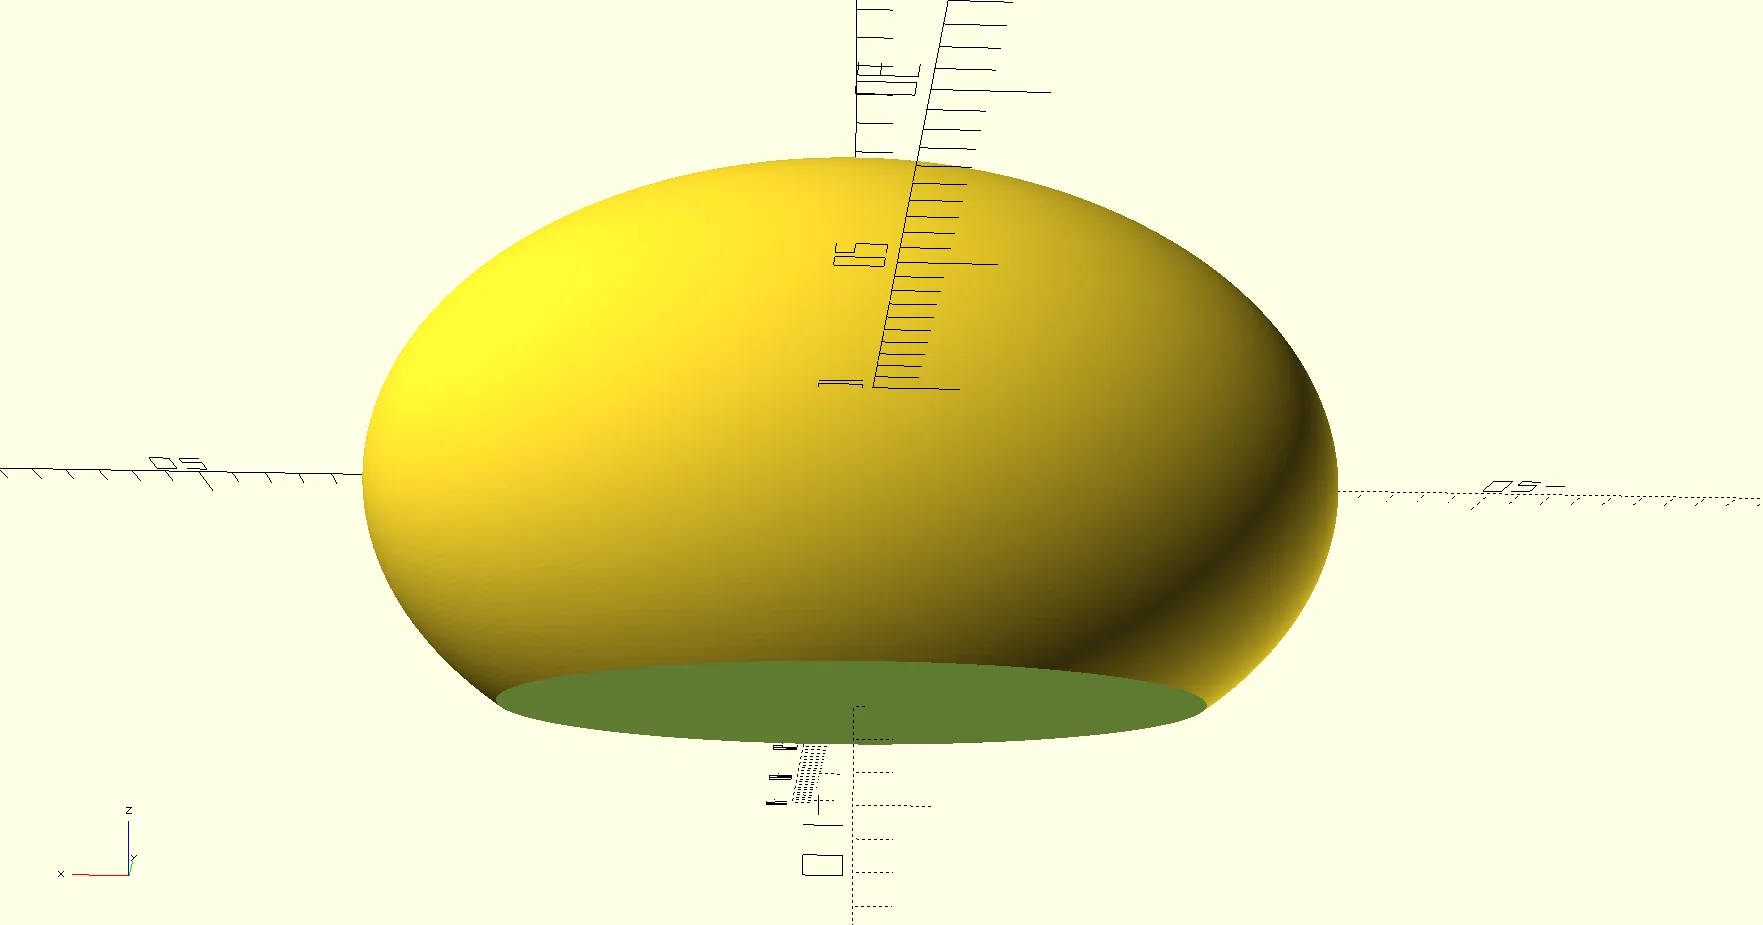
Now it’s time to incorporate the tail. We’ll introduce two new functions for this purpose. First, the os/rotate function, which accepts
a map of axes and angles as arguments, allowing us to rotate an object around a specific axis. Second, the os/hull function will be used.
ℹ️ os/rotate is used to rotate a shape in three-dimensional space
ℹ️ os/hull is used to create a new shape that encompasses multiple input shapes. It takes multiple shapes as arguments and generates a new shape that covers the outer boundary of all the input shapes. The resulting shape forms a convex hull that encloses the combined geometry of the input shapes.
To design the tail more effectively and have a better overview of our progress, we will create a separate definition for it.
As a foundation for the tail, we will generate a scaled sphere with a radius of 2. However, this time we will scale it along both the :x and :y axes.
(def tail
  (os/scale {:x 2 :y -0.1} (os/sphere {:radius 2})))


(core/write tail)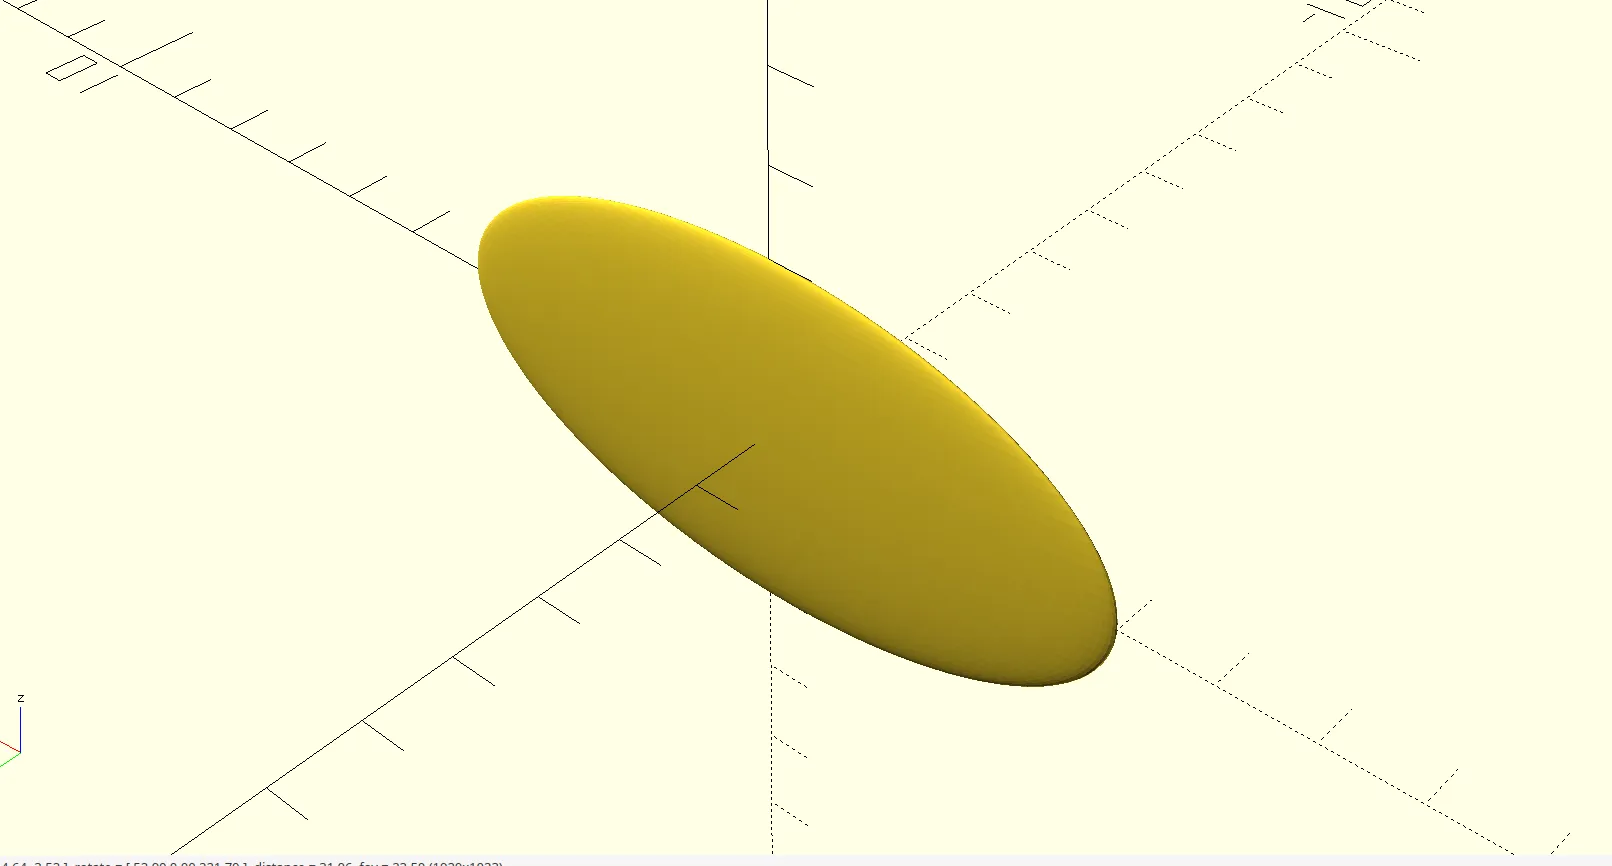
If we apply os/hull to the body shape and tail, we won’t observe any changes because the tail piece will be contained within the body.
(def body
  (os/hull (os/difference (os/scale {:x 1.5}
                                    (os/sphere {:radius 10
                                                :resolution resolution}))
                          (os/translate {:z -17 :x -50 :y -50}
                                        (os/cube [100 100 10])))
           tail))

(core/write body)
By shifting the tail towards the right (along the x-axis) and upward (along the z-axis), the tail is an integrated part of the body and is clearly visible.
(def tail
  (os/translate {:x 14 :z 2}
                (os/scale {:x 2 :y -0.1} (os/sphere {:radius 2}))))
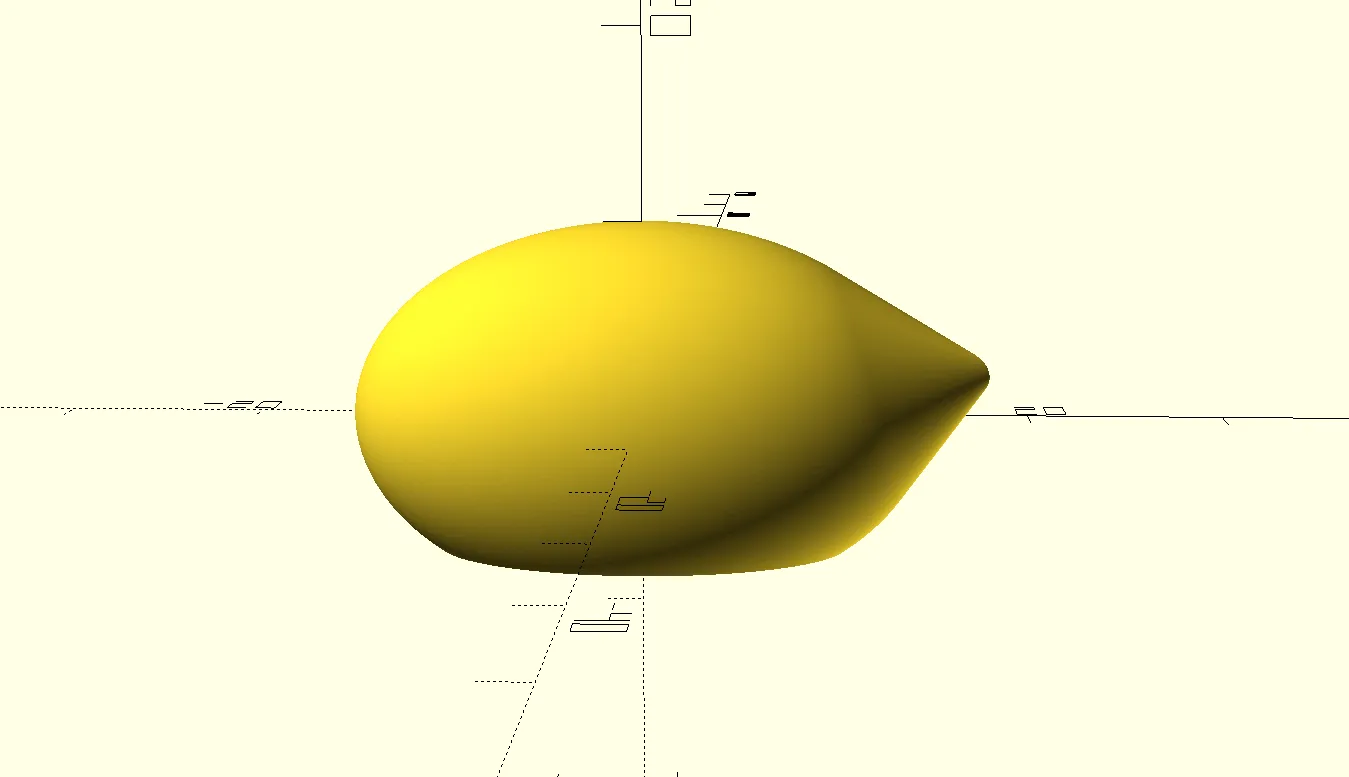
However, at the moment, it doesn’t resemble the body of a duck at all. Instead, I would say it appears more like a peculiar lemon shape. To change this, we can achieve a more accurate representation by rotating the tail along the y-axis.
Let’s use os/rotate again, the function used to rotate a shape in three-dimensional space
(def tail
  (os/rotate {:y -25}
             (os/translate {:x 14 :z 2}
                           (os/scale {:x 2 :y -0.1} (os/sphere {:radius 2})))))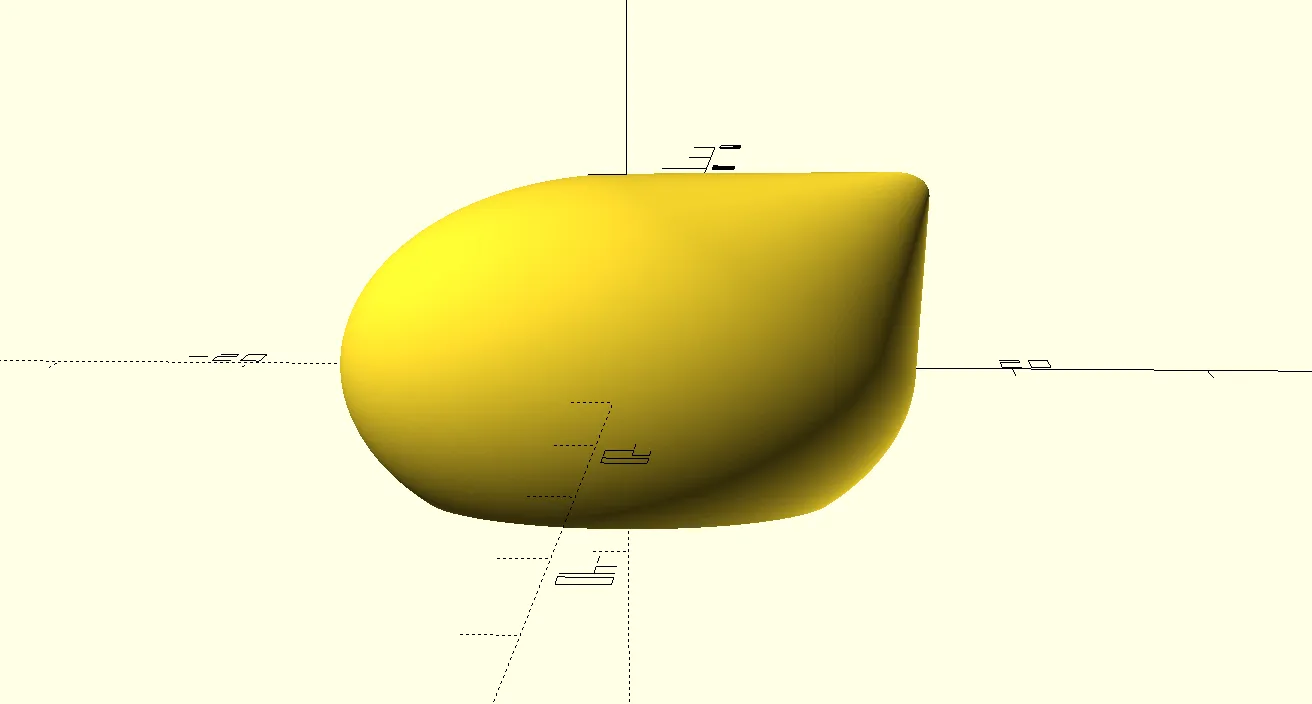
Although it has improved, it’s still not perfect. It’s time to make some adjustments by cutting a specific shape from the duck body. This will help us create a duck body that looks, at the very least, appealing.
(def tail-cut
  (->> (os/sphere {:radius 5})
       (os/scale {:x 3 :y 2})
       (os/translate {:x 8 :z 7})
       (os/rotate {:y -22})))

(core/write tail-cut)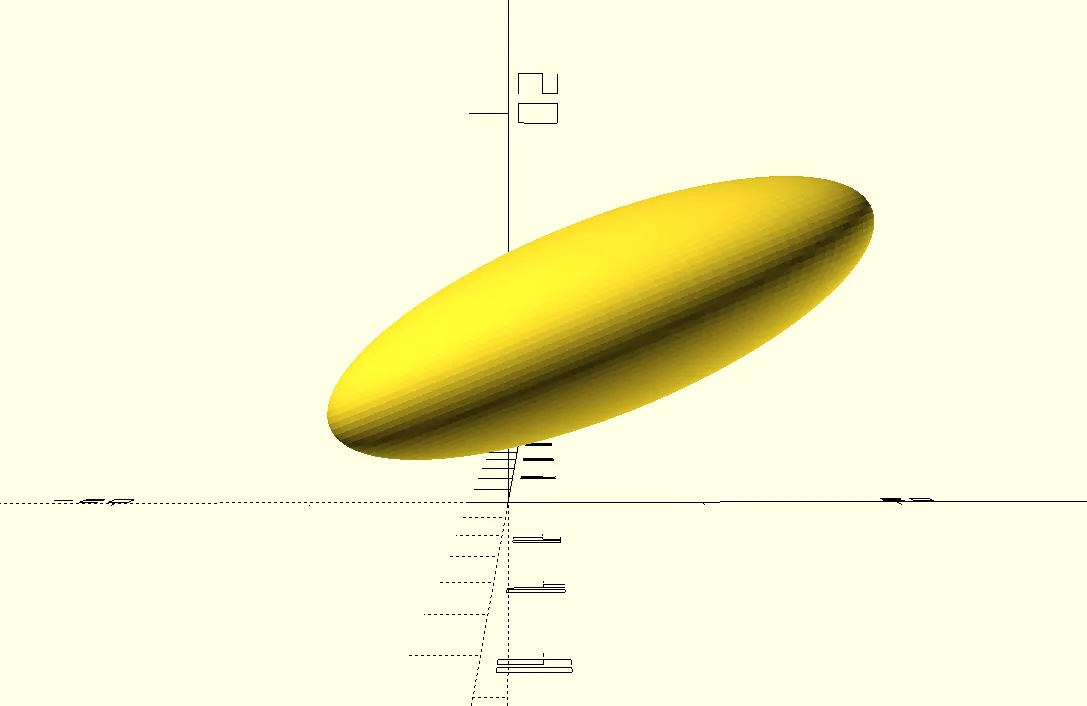
Now let’s proceed to create a duck definition where we will start assembling the various pieces. The initial step involves taking the difference between the body and the tail-cut. However, before doing so, we will extract the tail from the body function, leaving the function to exclusively handle the body. Inside the duck definition, we will introduce a hull operation.
(def body
  (os/difference (os/scale {:x 1.5}
                           (os/sphere {:radius 10
                                       :resolution resolution}))
                 (os/translate {:z -17 :x -50 :y -50}
                               (os/cube [100 100 10]))))

(def duck
  (os/hull body tail))

(core/write duck)
We will now continue by cutting the tail section.
(def duck
 (os/difference (os/hull body tail) tail-cut))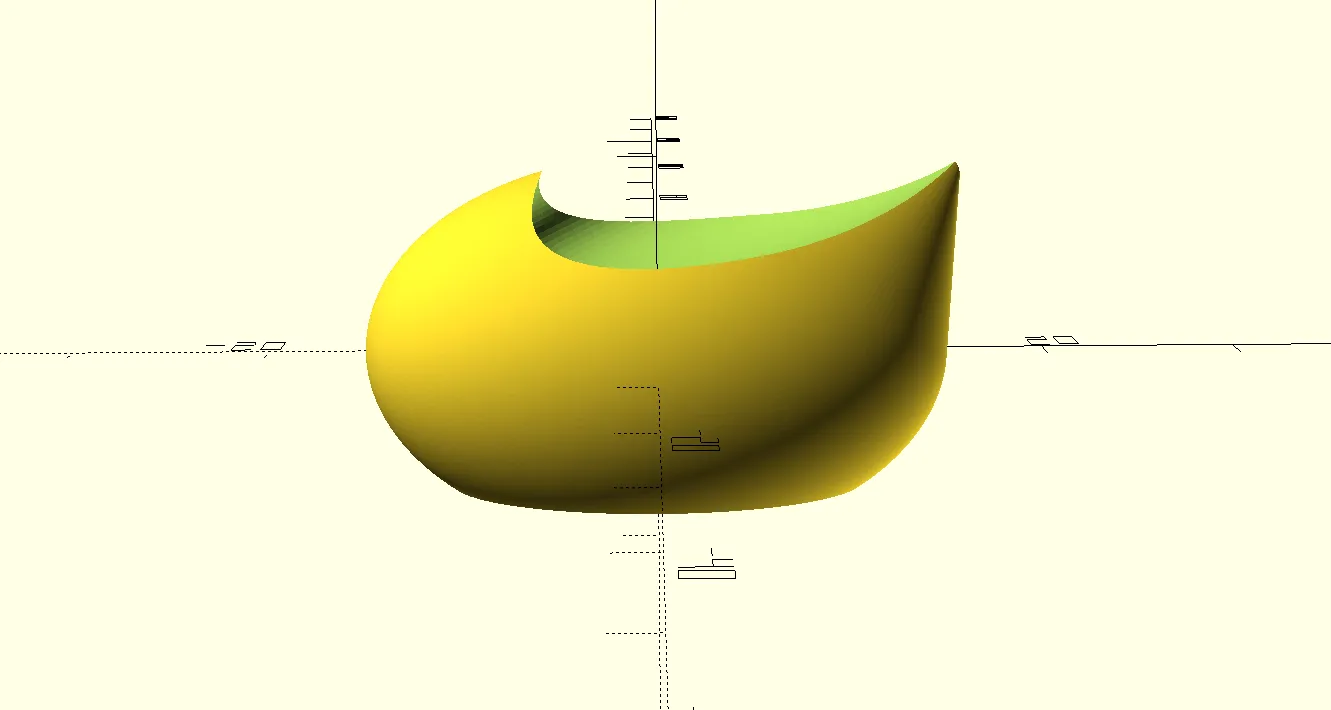
We will include the body component once again. After removing the tail from the body definition,
the shape now primarily consists of an egg shape with a flat bottom. To connect multiple pieces together,
we will utilize the os/union function.
ℹ️_os/union is used to combine multiple shapes or geometries into a single object._
(def duck
  (os/union body (os/difference (os/hull body tail) tail-cut)))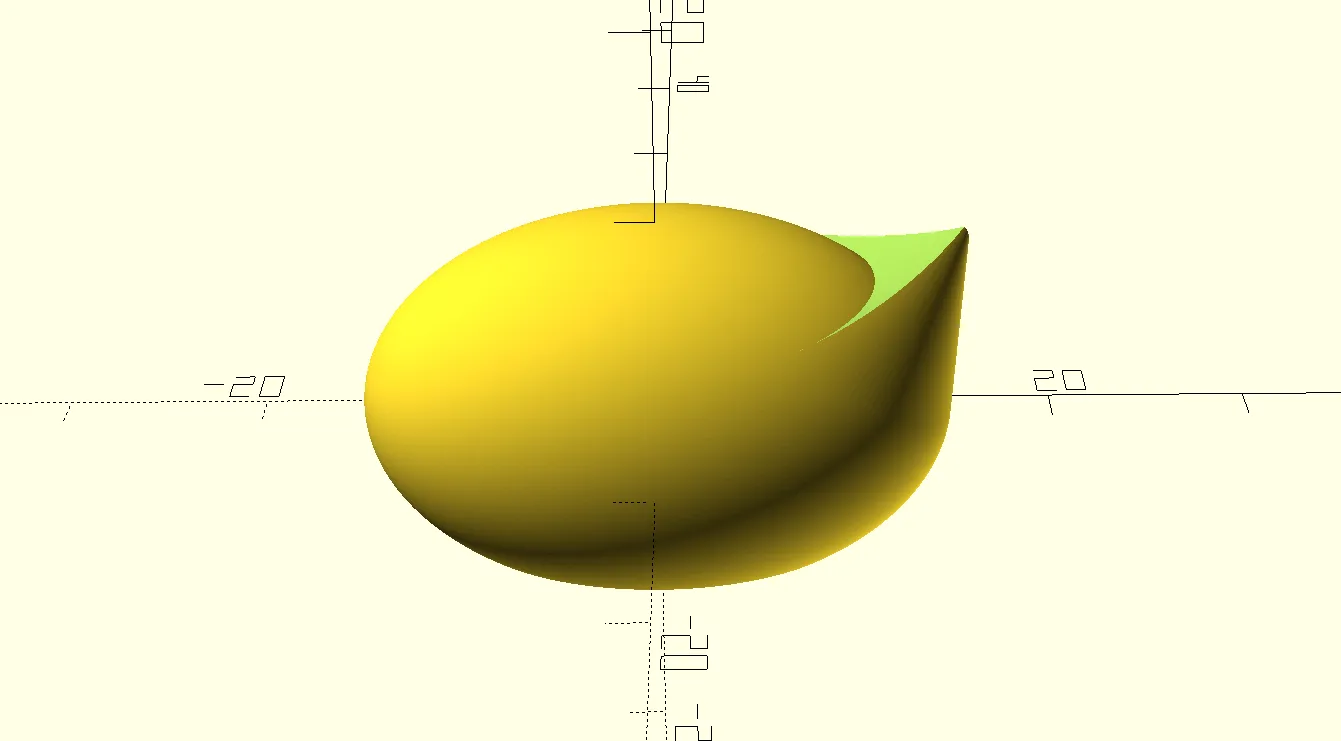
Now we reach an interesting part where we will use the power of Clojure functions. We’re going to create the wings for our design. Let’s start with the feather component, which involves scaling, translating, and rotating a sphere shape.
(defn feather [translate-x translate-y feather-size rotate-y]
  (->> (os/sphere {:radius feather-size
                   :resolution resolution})
       (os/scale {:x 2.9 :z 1.5})
       (os/translate {:x translate-x
                      :y translate-y})
       (os/rotate {:y rotate-y})))
We can visualize the feather by rendering it. And by experimenting with different feather sizes, we can determine the ideal size for our duck.
(core/write (feather 0 0 2 0))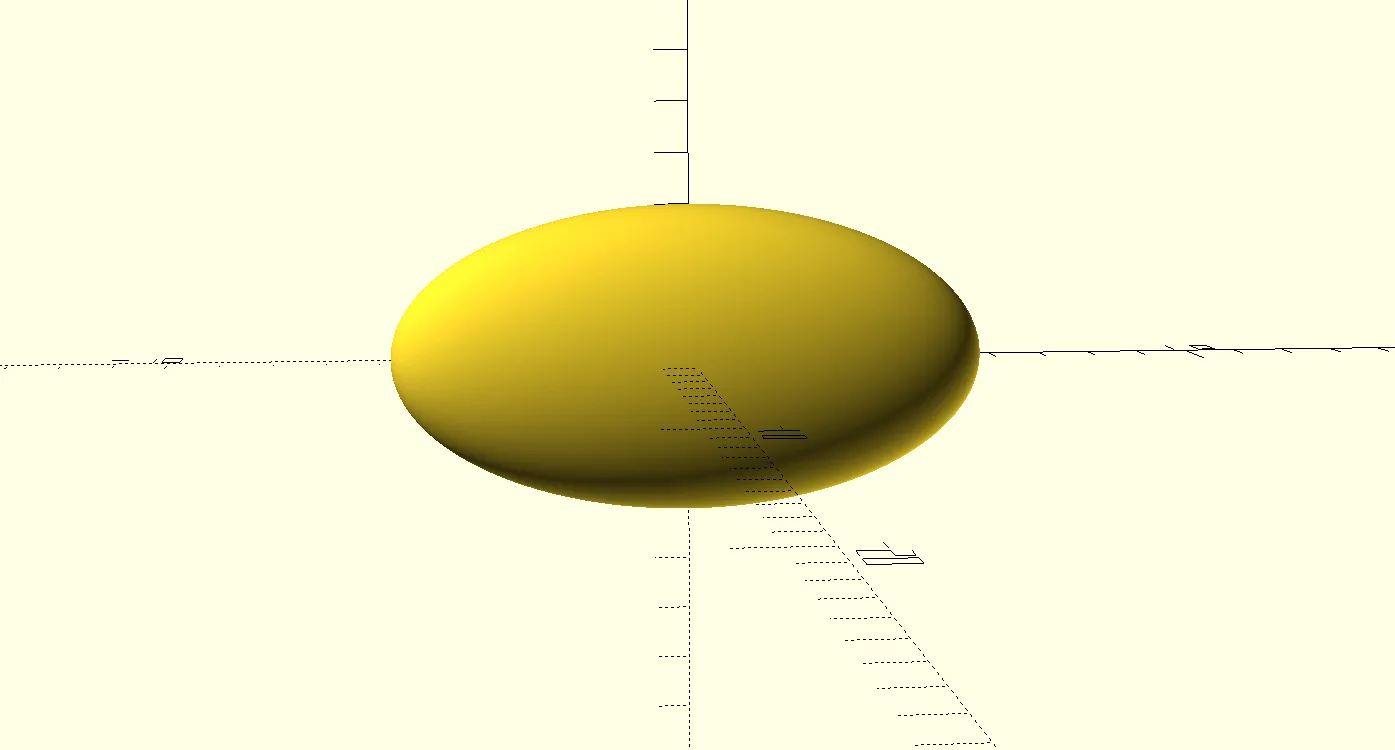
After rendering various feather sizes, I concluded that the optimal size for the outer feathers is 2, while for the inner feathers it is 1.5.
With this information in mind, we can proceed to create a row of feathers. This function will accept translation coordinates “x” and “y” as arguments to determine the position of the feather row. Additionally, it will take the feather size and rotate-y coordinate to appropriately rotate the feathers, ensuring they point in the desired direction.
If you’re new to Clojure and wondering what is the purpose of the map function, you can learn more about it by reading this resource.
(defn row-of-feathers [translate-x translate-y feather-size feathers-count]
  (let [feather-angles (range 30 -11 (- (/ 40 (dec feathers-count))))]
    (map (partial feather translate-x translate-y feather-size)
         feather-angles)))
To ensure that the feather row spans a total of 40 degrees (because it covers exactly the area we need), we need to assign each feather a specific angle.
We can calculate the angle for each feather using the expression (range 30 -11 (- (/ 40 (dec feathers-count)))).
To see whether it matches our expectations, we can render the feather row.
(core/write (apply os/union (row-of-feathers 5 0 1 4)))To combine all the individual feathers into a single wing, we use the (apply (os/union ...) function. In this particular case,
we apply it only for rendering purposes to see if the row of wings aligns with our intended design. Additionally, we have provided a translation of
translate-x 5 to the row of feathers. This is necessary because we are rotating the feathers and need to position them further away from the center point.
When we rotate the shape around its center point:
(core/write (apply os/union (row-of-feathers 0 0 1 4)))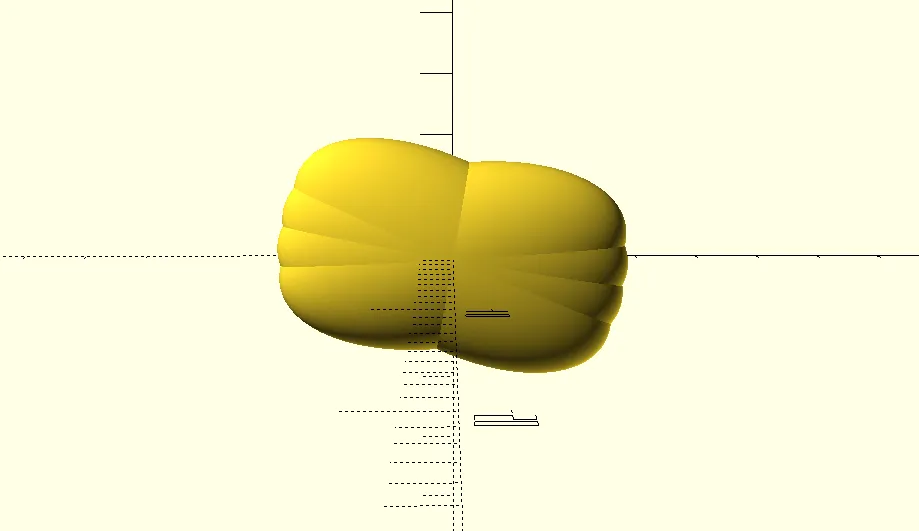
And when we translate it along the x-axis:
(core/write (apply os/union (row-of-feathers 5 0 1 4)))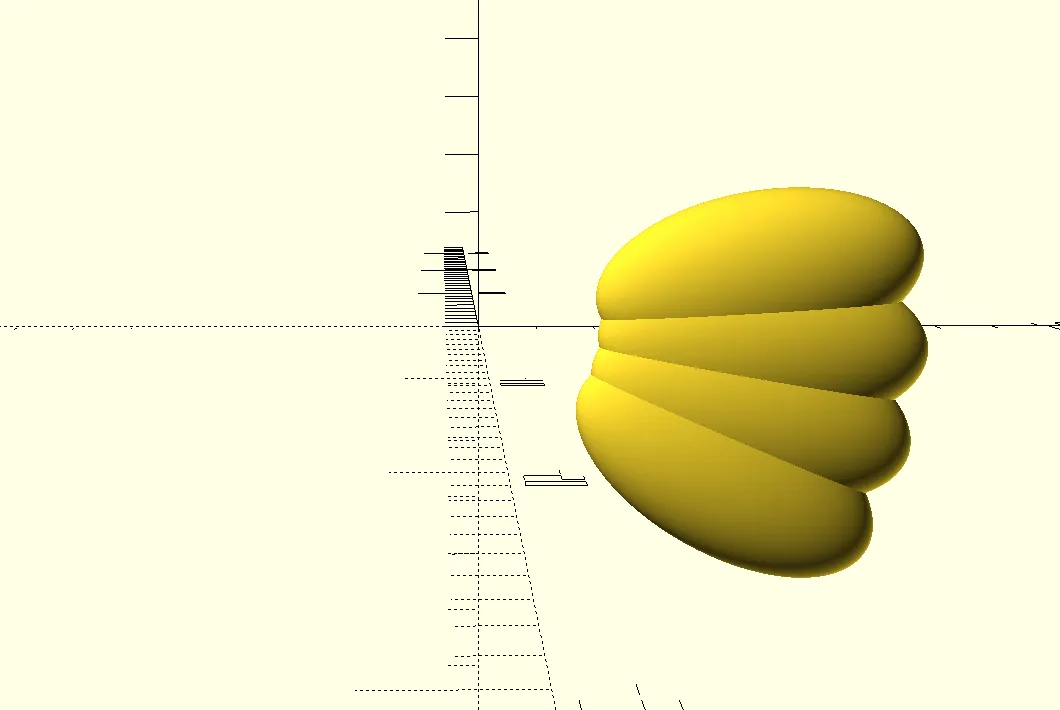
Now let’s combine the large and small feathers.
(defn create-wing [{:keys [outer-feathers-count outer-feather-size
                           inner-feathers-count inner-feather-size]}]
  (apply os/union
         (apply merge
                (row-of-feathers 5 0 outer-feather-size outer-feathers-count)
                (row-of-feathers 3.5 -1.1 inner-feather-size inner-feathers-count))))

(core/write (create-wing {:outer-feathers-count 3
                          :outer-feather-size 2
                          :inner-feathers-count 4
                          :inner-feather-size 1.5}))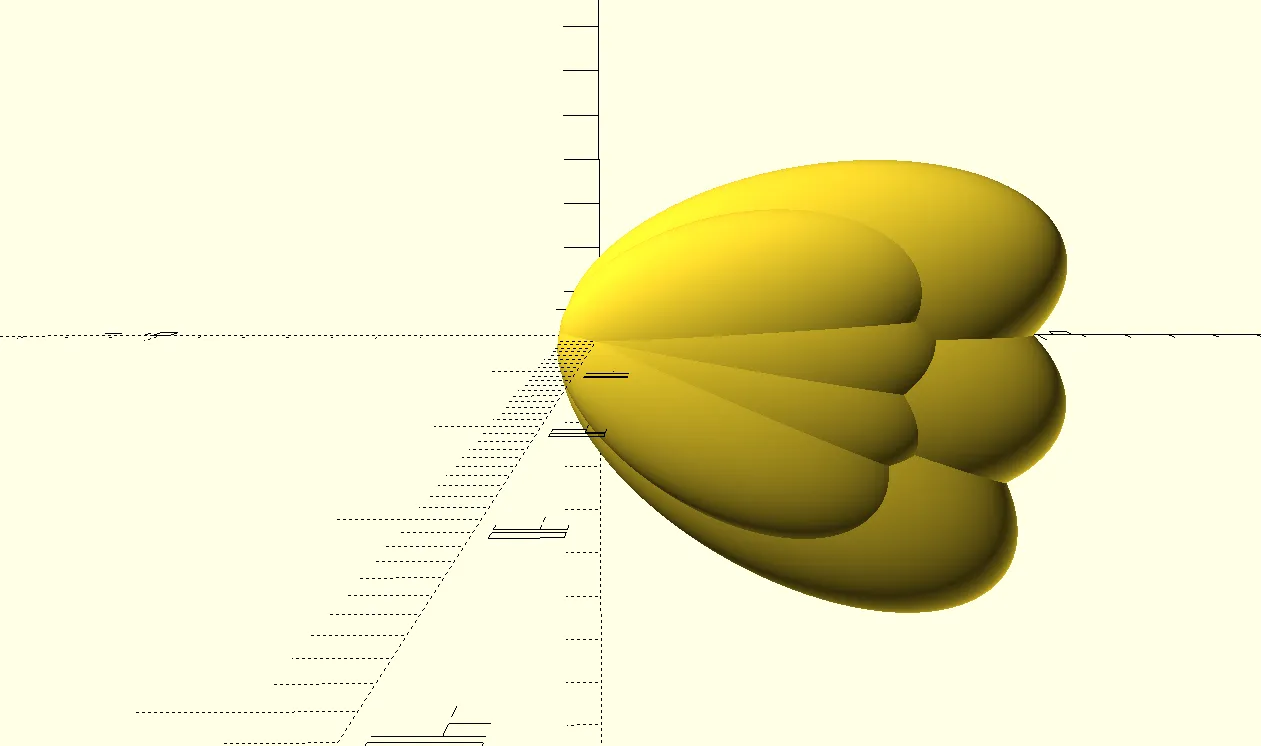
We can then place it on the duck’s body, making use of rotation and translation to position it correctly.
(def duck
  (let [left-wing (os/rotate {:y -25}
                             (os/translate {:x -3.5
                                            :y -8.8
                                            :z 0.5}
                                           (create-wing {:outer-feathers-count 3
                                                         :outer-feather-size 2
                                                         :inner-feathers-count 4
                                                         :inner-feather-size 1.5})))]
    (os/union body left-wing (os/difference (os/hull body tail) tail-cut))))

(core/write duck)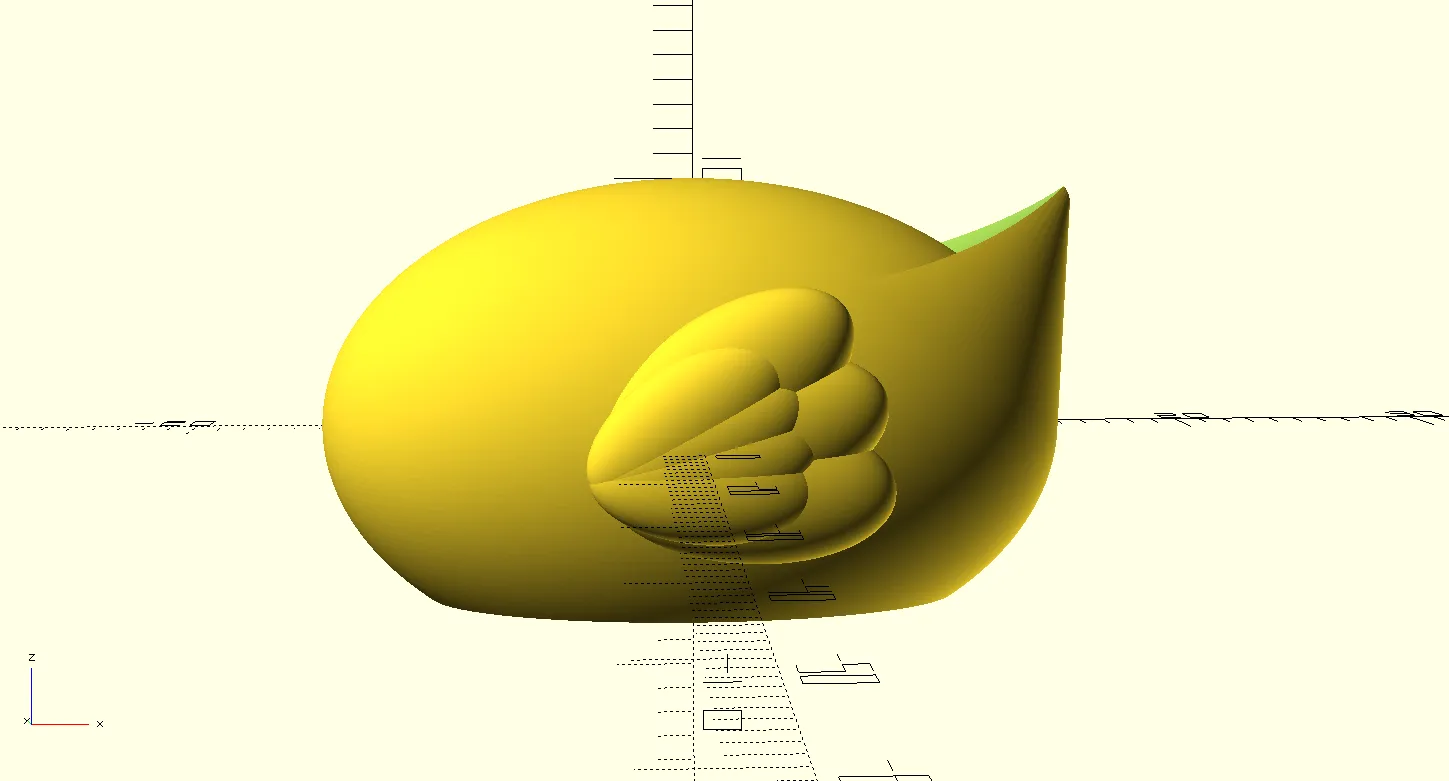
To incorporate a wing on the opposite side, we can use the (os/mirror) function to mirror it around the :y axis.
ℹ️_os/mirror function is used to create a mirrored or reflected copy of a shape._
(def duck
  (let [left-wing (os/rotate {:y -25}
                             (os/translate {:x -3.5
                                            :y -8.8
                                            :z 0.5}
                                           (create-wing {:outer-feathers-count 3
                                                         :outer-feather-size 2
                                                         :inner-feathers-count 4
                                                         :inner-feather-size 1.5})))
        right-wing (os/mirror {:y 1} left-wing)]
    (os/union body left-wing right-wing (os/difference (os/hull body tail) tail-cut))))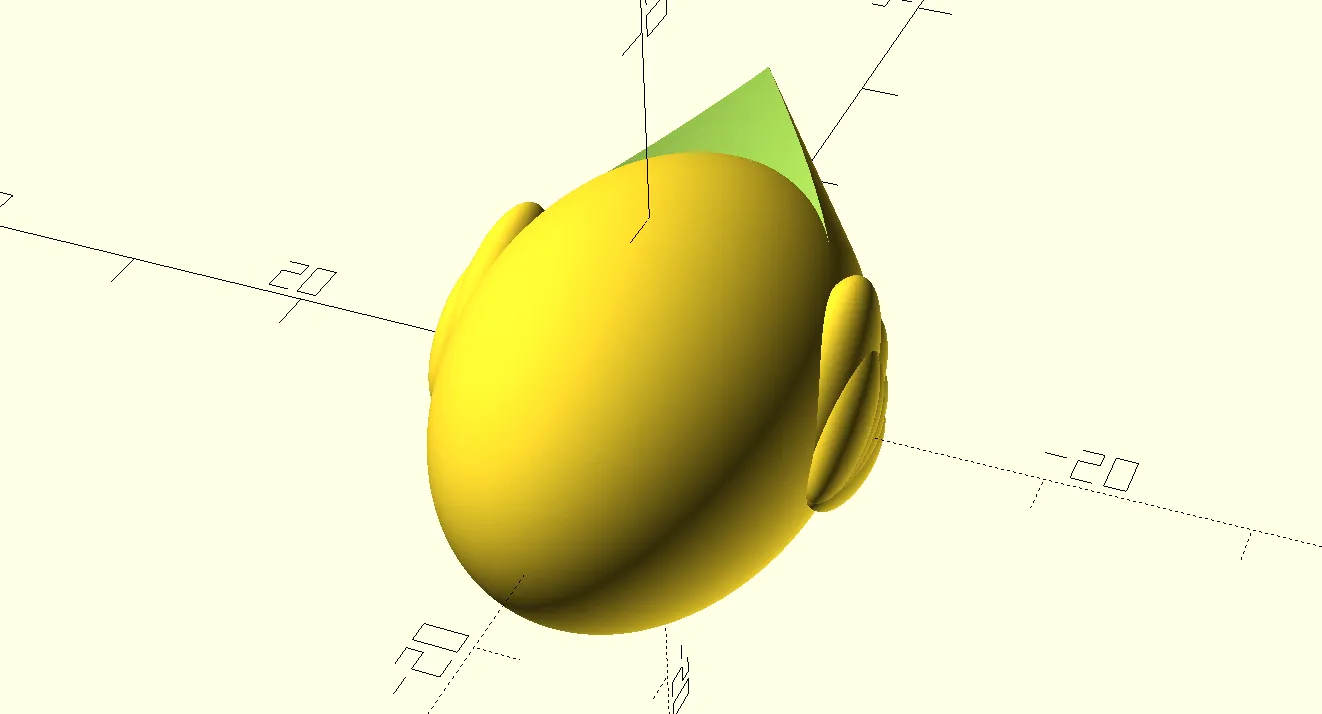
Incorporating the head is a straightforward process. We simply position a large sphere on top of the body.
(def head
  (os/translate {:x -5 :z 16}
                (os/scale {:x 1.1 :y 1.1}
                          (os/sphere {:radius 10
                                      :resolution resolution}))))

(def duck
  (let [left-wing (os/rotate {:y -25}
                             (os/translate {:x -3.5
                                            :y -8.8
                                            :z 0.5}
                                           (create-wing {:outer-feathers-count 3
                                                         :outer-feather-size 2
                                                         :inner-feathers-count 4
                                                         :inner-feather-size 1.5})))
        right-wing (os/mirror {:y 1} left-wing)]
    (os/union body
              left-wing
              right-wing
              head
              (os/difference (os/hull body tail) tail-cut))))
Additionally, we will include an eye on each side of the head.
(def eye
  (os/translate {:z 17
                 :x -13.5
                 :y -5}
                (os/union
                 (os/translate {:x -0.7
                                :z 0.3
                                :y -0.5}
                               (os/sphere {:radius 0.6}))
                 (os/scale {:z 1.2}
                           (os/sphere {:radius 1.4})))))

(def duck
  (let [left-wing (os/rotate {:y -25}
                             (os/translate {:x -3.5
                                            :y -8.8
                                            :z 0.5}
                                           (create-wing {:outer-feathers-count 3
                                                         :outer-feather-size 2
                                                         :inner-feathers-count 4
                                                         :inner-feather-size 1.5})))
        right-wing (os/mirror {:y 1} left-wing)
        right-eye eye
        left-eye (os/mirror {:y 1} right-eye)]
    (os/union body
              left-wing
              right-wing
              left-eye
              right-eye
              head
              (os/difference (os/hull body tail) tail-cut))))
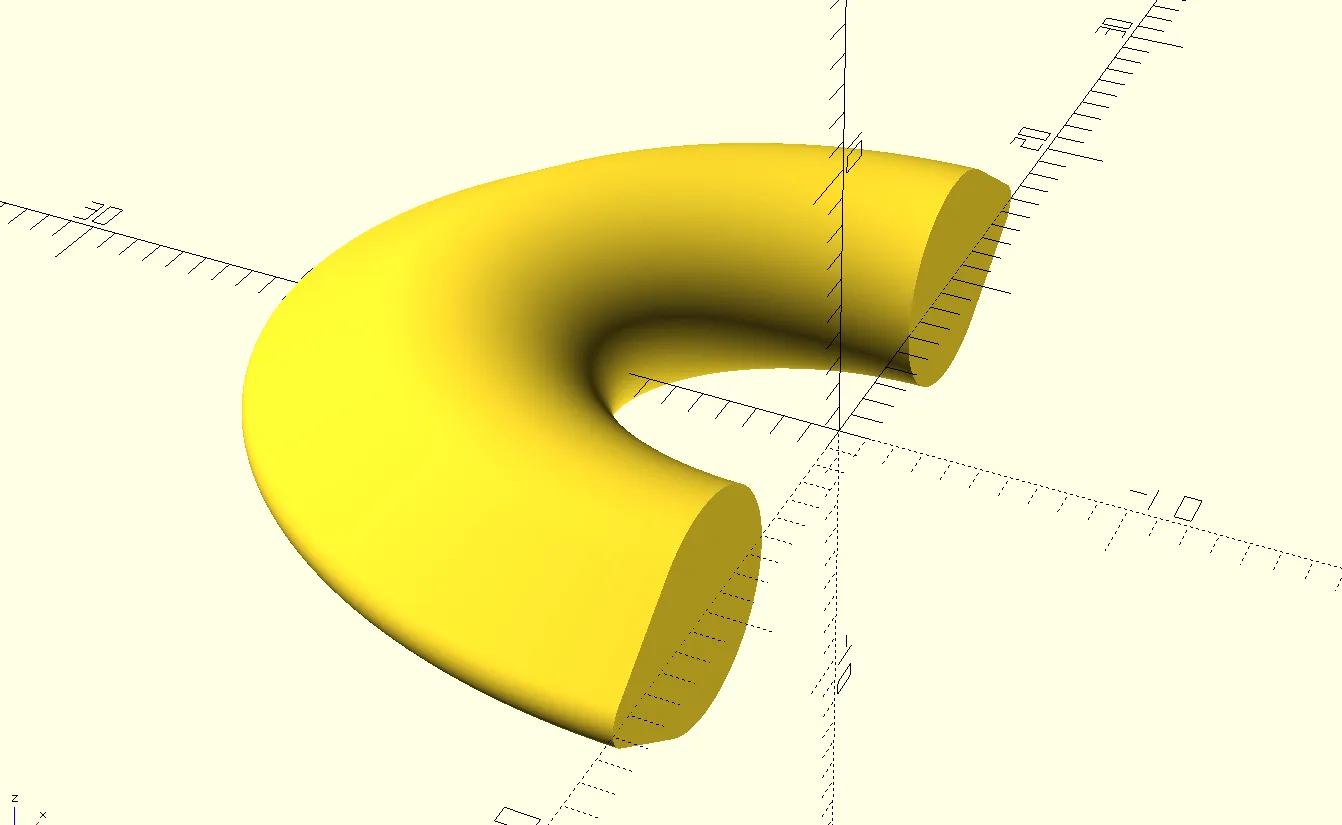
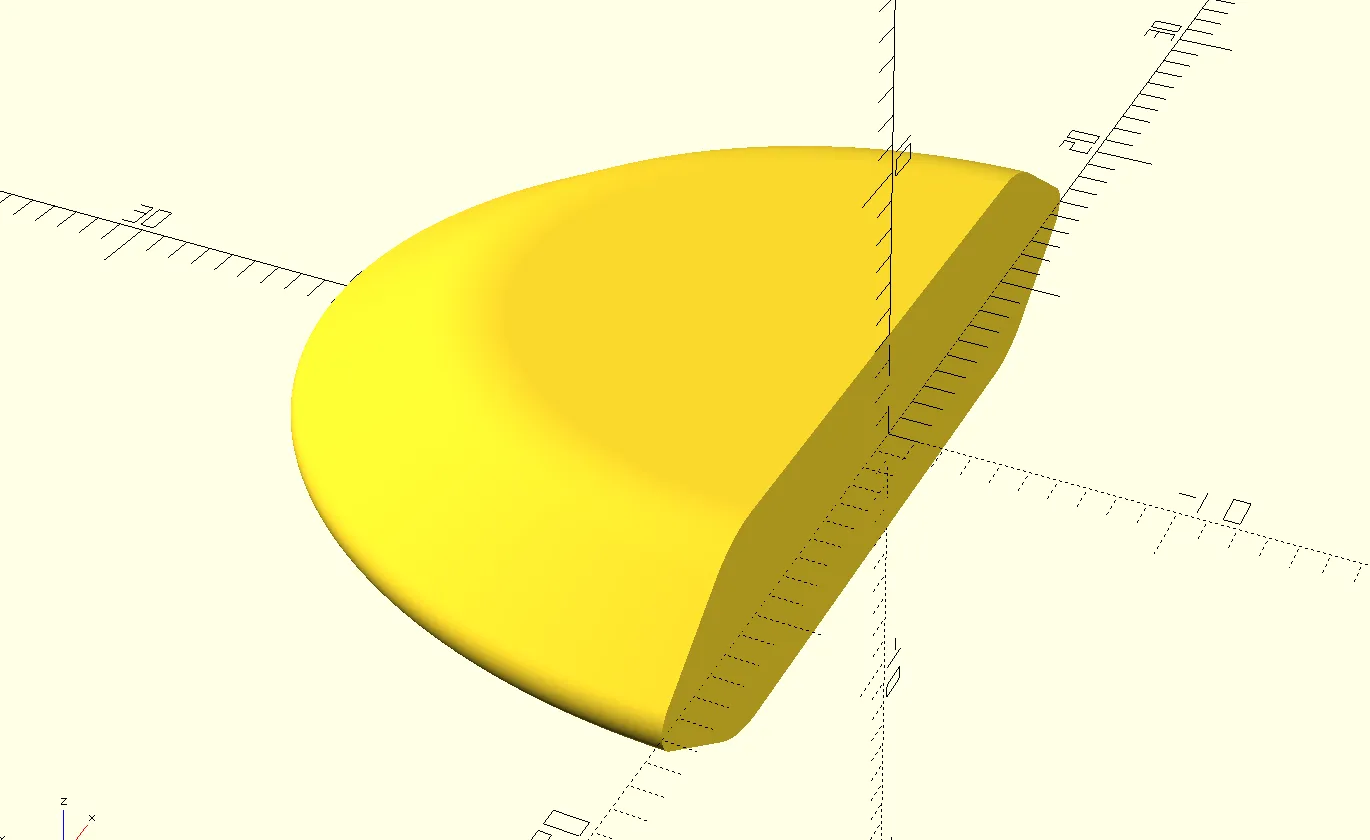
To construct the duck’s bill, let’s use the os/rotate-extrude function. This function generates a
3D object by rotating a 2D shape around the z-axis. We will begin with the following 2D shape.
(def bill
  (os/hull
   (os/translate {:x 15} (os/circle {:radius 1
                                     :resolution resolution}))
   (os/translate {:x 10} (os/circle {:radius 4
                                     :resolution resolution}))))
(core/write bill)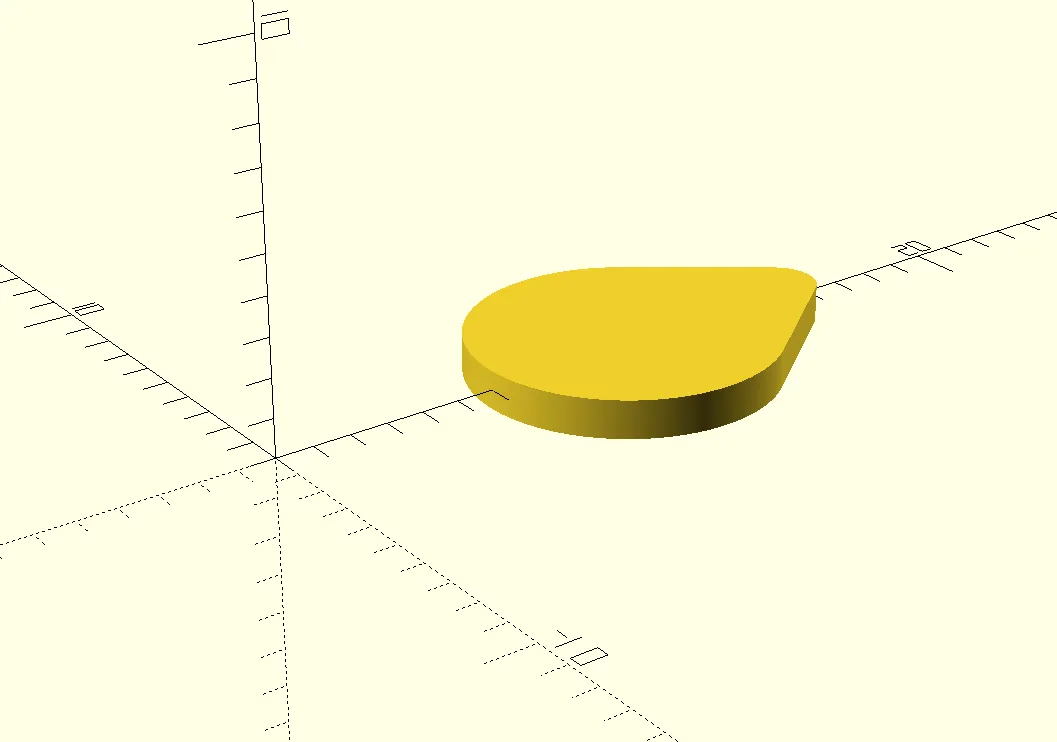
(def bill
  (os/scale {:y 1.3}
            (os/rotate-extrude
             {:angle 180
              :resolution resolution}
             (os/hull
              (os/translate {:x 15} (os/circle {:radius 1
                                                :resolution resolution}))
              (os/translate {:x 10} (os/circle {:radius 4
                                                :resolution resolution}))))))
After applying a small scaling adjustment, we will incorporate the os/hull function to finalize the bill design.
(def bill
  (os/hull (os/scale {:y 1.3}
                     (os/rotate-extrude
                      {:angle 180
                       :resolution resolution}
                      (os/hull
                       (os/translate {:x 15} (os/circle {:radius 1
                                                         :resolution resolution}))
                       (os/translate {:x 10} (os/circle {:radius 4
                                                         :resolution resolution})))))))
Position it onto the duck’s body.
(def duck
  (let [left-wing (os/rotate {:y -25}
                             (os/translate {:x -3.5
                                            :y -8.8
                                            :z 0.5}
                                           (create-wing {:outer-feathers-count 3
                                                         :outer-feather-size 2
                                                         :inner-feathers-count 4
                                                         :inner-feather-size 1.5})))
        right-wing (os/mirror {:y 1} left-wing)
        right-eye eye
        left-eye (os/mirror {:y 1} right-eye)
        bill (os/rotate {:z 90}
                        (os/translate {:z 13
                                       :y 8}
                                      (os/scale {:x 0.5
                                                 :y 0.5
                                                 :z 0.5}
                                                bill)))]
    (os/union body
              bill
              left-wing
              right-wing
              left-eye
              right-eye
              head
              (os/difference (os/hull body tail) tail-cut))))

(core/write duck)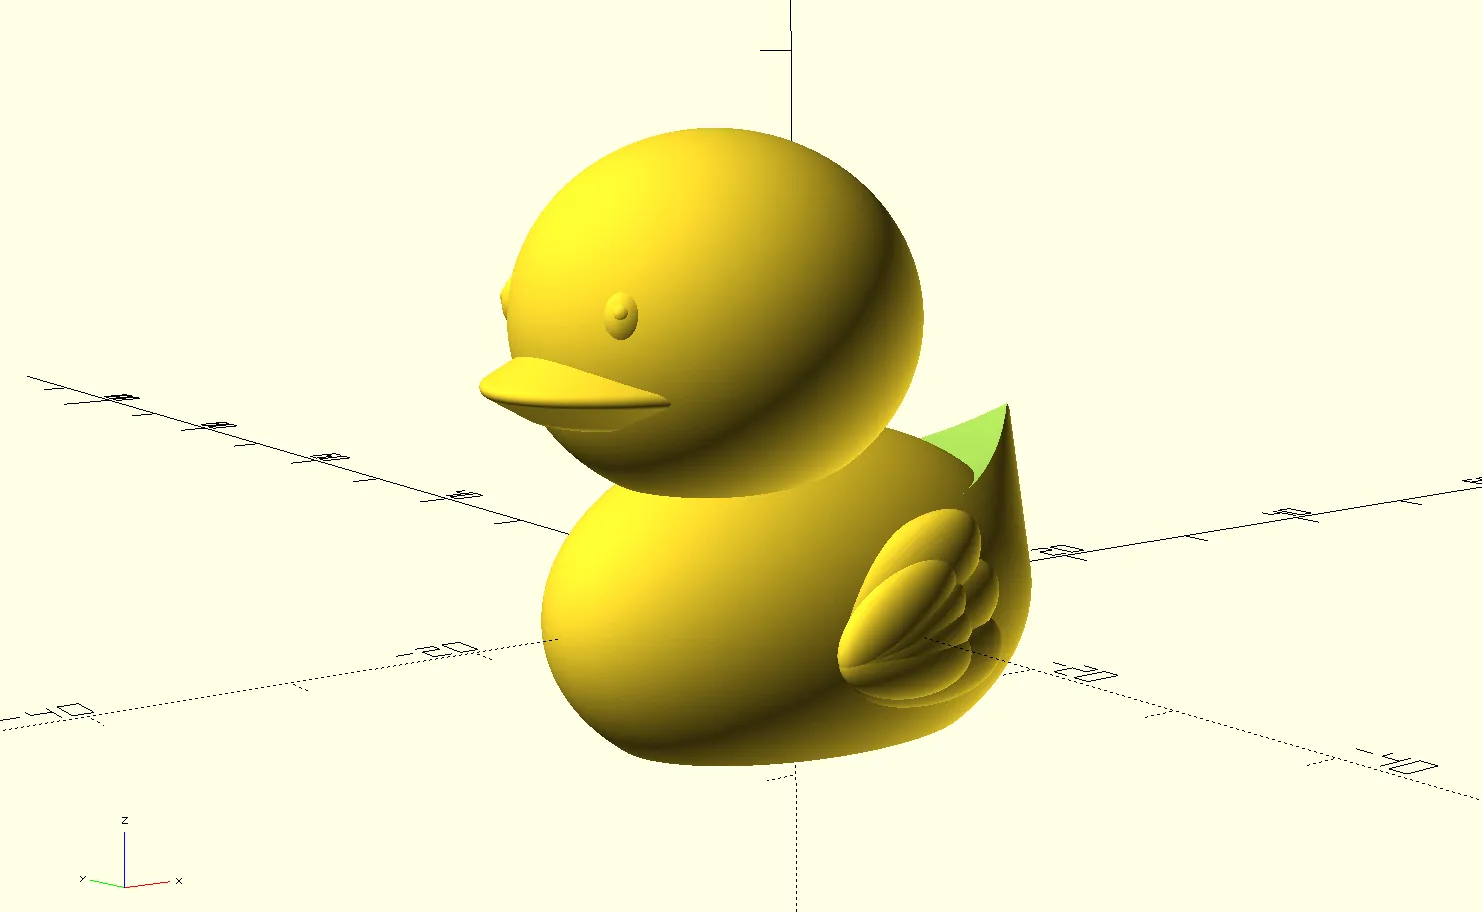
To add a touch of elegance to our duck, let’s give it a hat using shapes like os/rounded-cylinder and os/cylinder.
(def hat
  (os/union
   (os/cylinder {:radius 8
                 :height 1
                 :resolution resolution})
   (os/rounded-cylinder {:radius 5
                         :height 7
                         :resolution resolution})
   (os/rotate-extrude {:resolution resolution}
                      (os/translate {:x 8} (os/circle {:radius 1})))))

(core/write hat)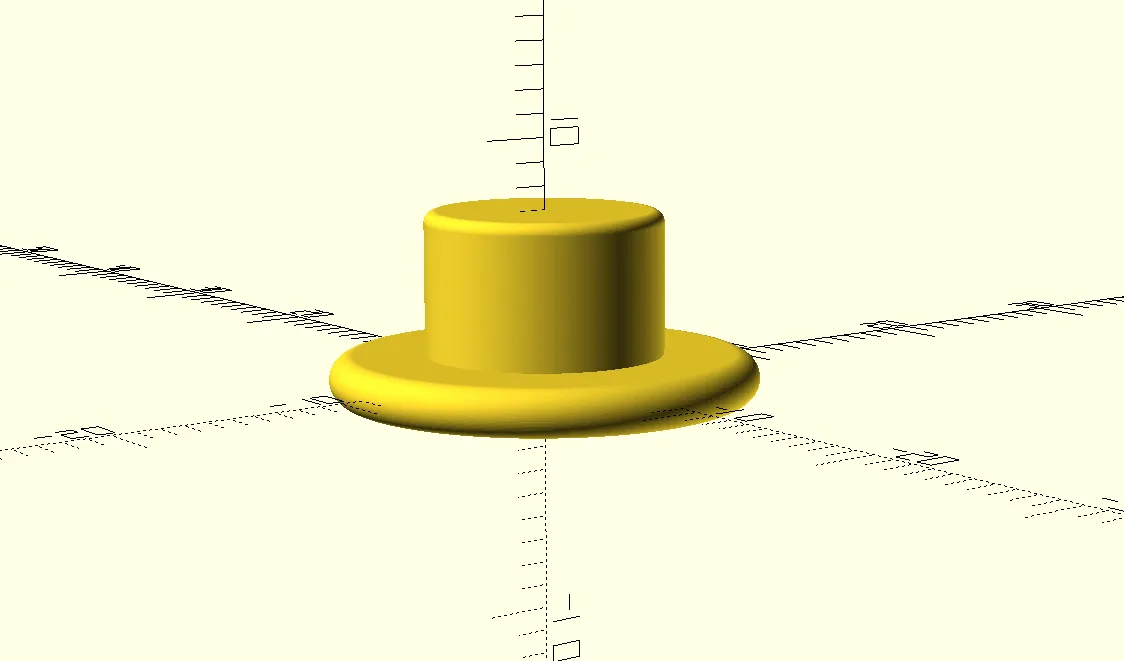
If you want to personalize your duck further, you can also add text using os/text. We will position it on top of the hat.
Since the text is a 2D object and we are working with 3D shapes, we will use the os/linear-extrude function.
This function transforms the 2D shape into a 3D object by extruding it in the z-axis.
The height parameter determines the extent of the extrusion along the z-axis.
ℹ️_os/linear-extrude is used to create a 3D object by extruding a 2D shape in a specified direction. It takes a 2D shape as input and extends it along the specified axis to generate a solid 3D object._
(def text
  (os/linear-extrude {:height 1}
                     (os/text {:text "JUXT"
                               :size 2})))

(core/write text)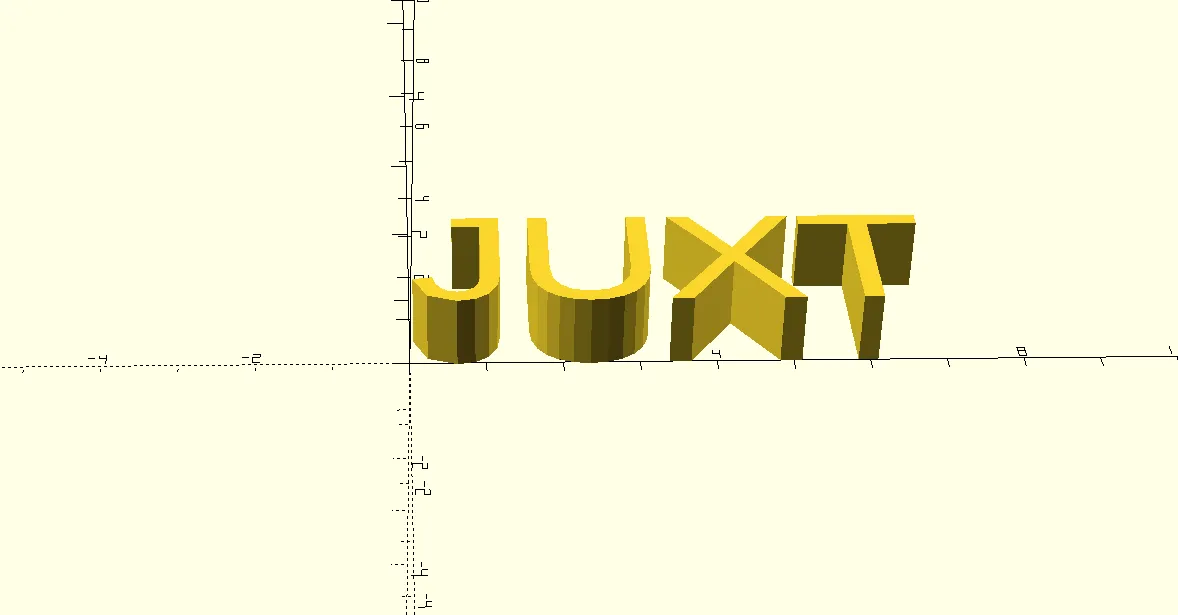
We will incorporate the text into the hat by utilizing the os/difference function, creating an embossed effect on the top surface of the hat.
(def hat
  (os/difference (os/union
                  (os/cylinder {:radius 8
                                :height 1
                                :resolution resolution})
                  (os/rounded-cylinder {:radius 5
                                        :height 7
                                        :resolution resolution})
                  (os/rotate-extrude {:resolution resolution}
                                     (os/translate {:x 8} (os/circle {:radius 1}))))
                 (os/translate {:z 6
                                :x -3.5
                                :y -1}
                               text)))

(core/write hat)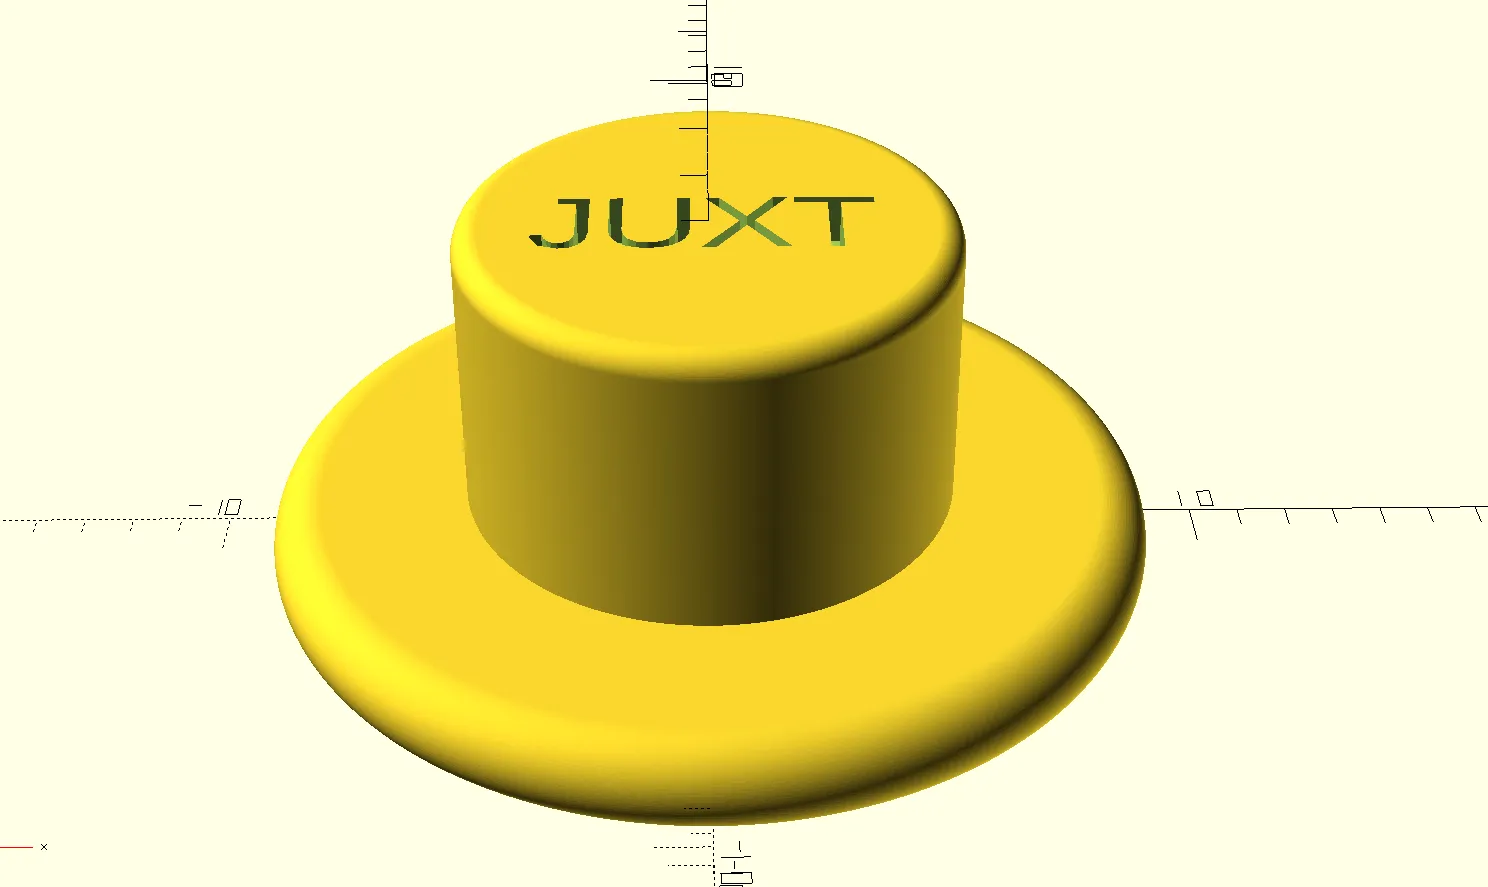
Let’s position the hat on top of the duck’s head.
(def duck
(let [left-wing (os/rotate {:y -25}
(os/translate {:x -3.5
:y -8.8
:z 0.5}
(create-wing {:outer-feathers-count 3
:outer-feather-size 2
:inner-feathers-count 4
:inner-feather-size 1.5})))
right-wing (os/mirror {:y 1} left-wing)
right-eye eye
left-eye (os/mirror {:y 1} right-eye)
bill (os/rotate {:z 90}
(os/translate {:z 13
:y 8}
(os/scale {:x 0.5
:y 0.5
:z 0.5}
bill)))
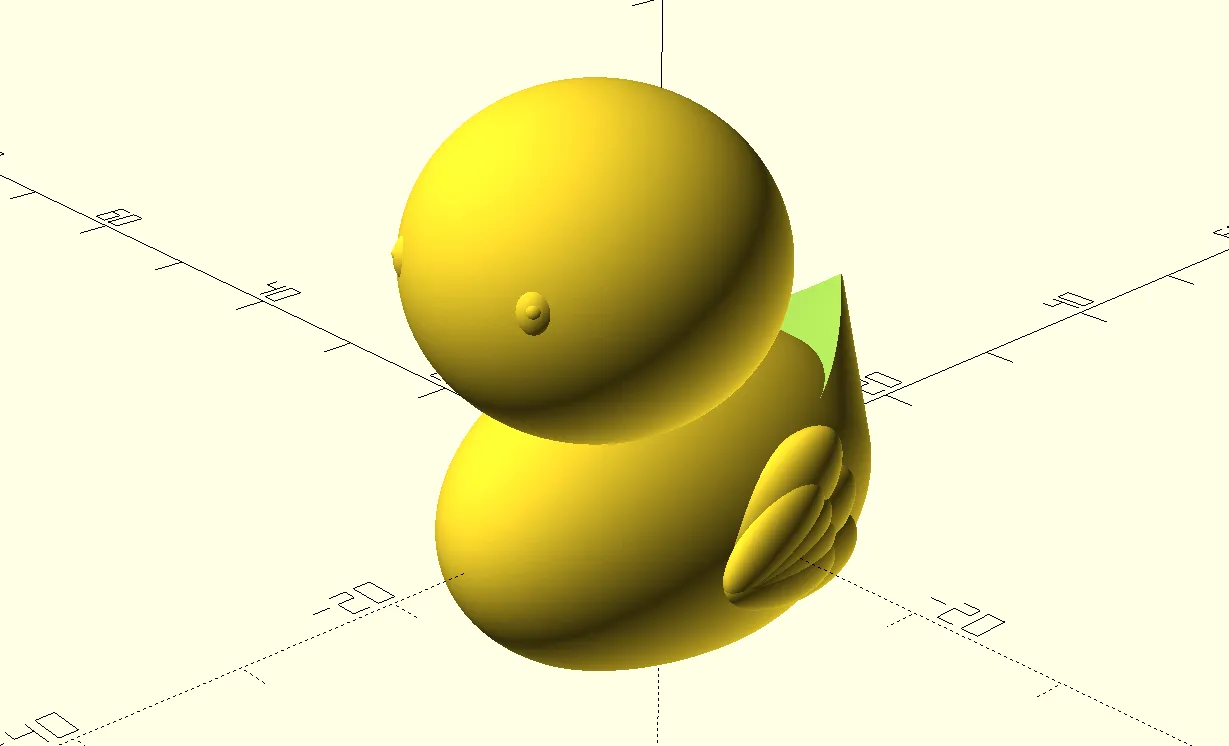
hat (os/rotate {:x 25}
(os/translate {:z 23.6
:x -5
:y 6}
(os/scale {:x 0.7
:y 0.7
:z 0.7}
hat)))]
(os/union body
bill
left-wing
right-wing
left-eye
right-eye
head
hat
(os/difference (os/hull body tail) tail-cut))))
(core/write duck)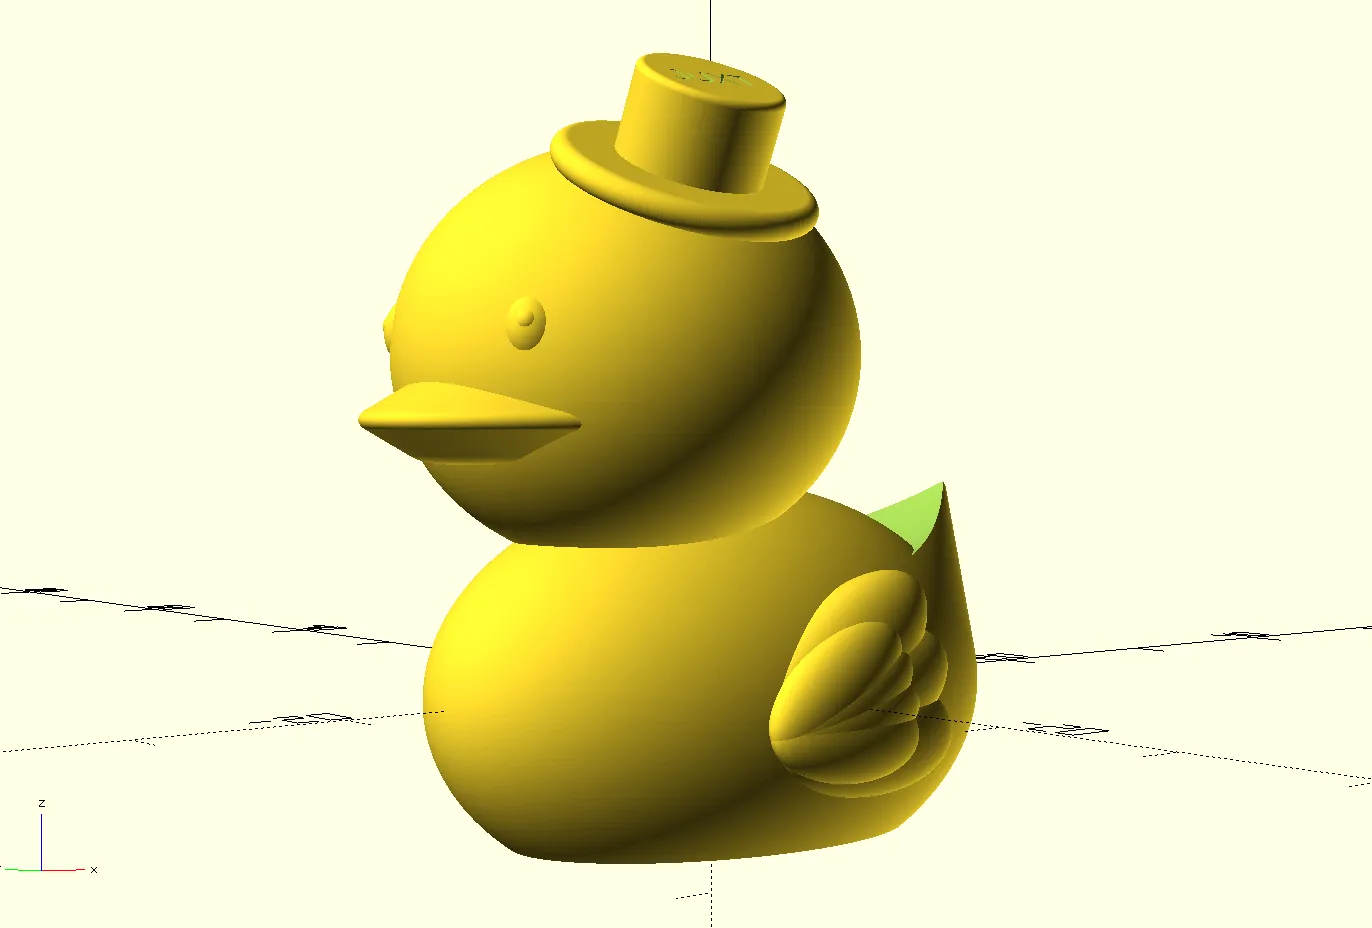
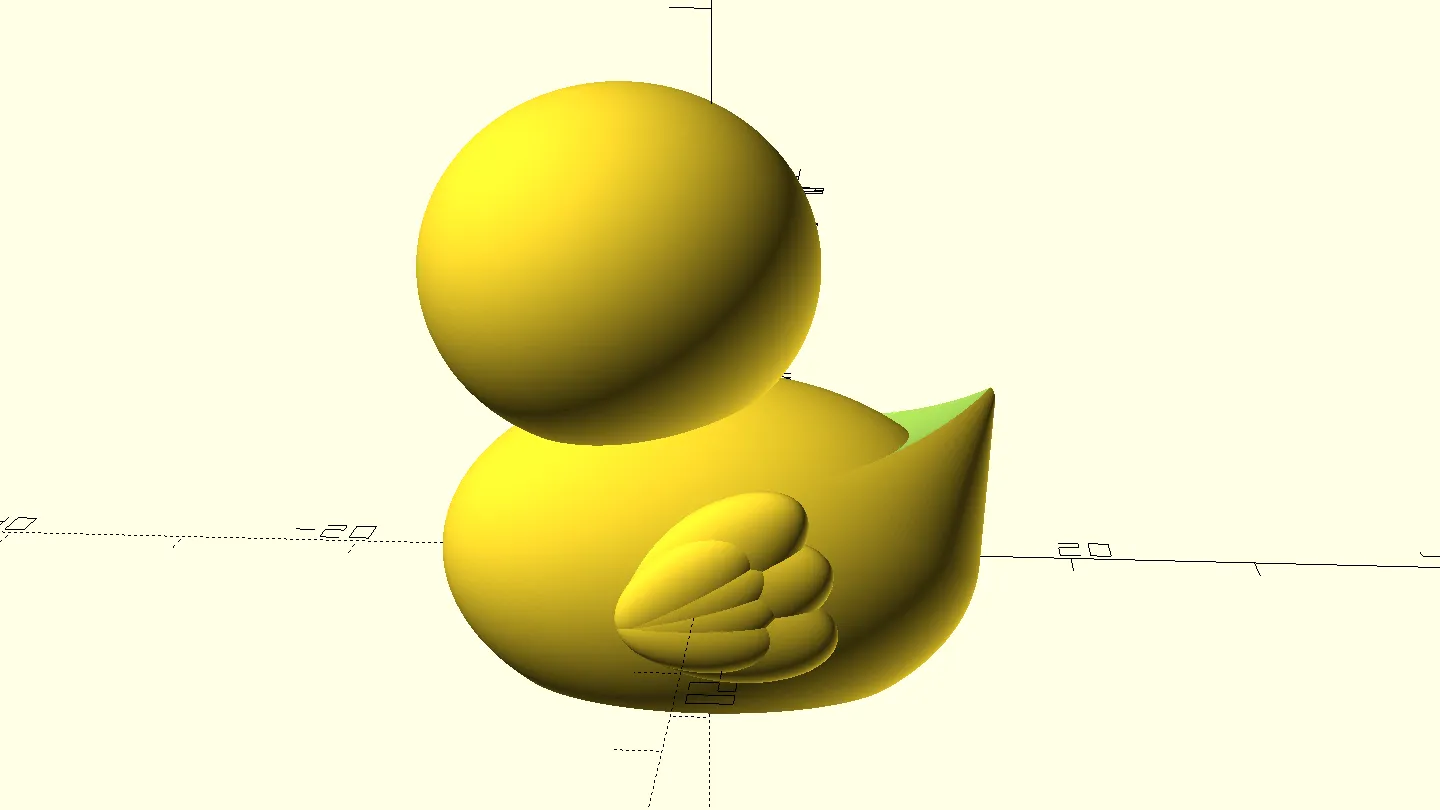
The duck is now complete, and doesn’t he look dapper with his charming hat? :)
You can access the complete code and additional examples here
Bringing Your Designs to Life:
To render your duck or any other object you’ve designed, navigate to edit -> render in OpenSCAD.
From there, you can prepare your design for printing on your 3D printer or submit it to a local or online 3D printing service.
Now you can see that by combining the elegance and expressiveness of Clojure with the innovative capabilities of 3D printing, you have the power to turn your ideas into reality.
With Mr Duck, we wish you luck! :)